The annealing temperature is the temperature at which the PCR primers bind to the complementary template region, usually between 50ºC to 68ºC. Learn about annealing temperature in this article.
We have started exploring PCR, PCR optimization and related things, once again. We already have many articles on the present topic which you can read on our blog. I have a huge research experience in PCR and related techniques, and that’s why I am daring to write things around it.
Our motto is to give you the best advice that you can use to optimize your experiments, notwithstanding, the protocol and procedure may vary from lab to lab. I strongly recommend you visit this category to read more:
Category: PCR technology
Ok, so let’s come to the point.
Researchers use PCR the amplify/synthesize the DNA, it is a thermocycler that relies on the temperature differences for amplifying DNA. Meaning, Using different temperatures we can achieve amplification.
If you are reading this article, I can imagine probably you know some basic stuff regarding PCR. So we ain’t discuss it here. Our blog has tons of content on this topic.
In the present blog post, I will only explain to you what the annealing temperature is! And how can you set it? In addition, I will also make you understand how you can optimize your PCR by annealing temperature.
Stay tuned,
Key Topics:
What is PCR annealing temperature?
Put simply, the annealing temperature is the temperature at which the primers bind to the complementary region on the target DNA. Setting up an annealing temperature highly depends on the primer length and composition.
So first we have to understand how primers are designed. You can read this article to learn more: PCR primer design Guidelines.
A good pair of PCR primers must follow several criteria, here are some,
- Length between 18 to 22 bases.
- GC content between 50 to 55%.
- Low hairpin structure
- Low primer-dimer tendency.
- High specificity.
The annealing temperature depends on the length of the primers, GC content and specificity. And of course, on the melting temperature!
“At a temperature, when half of the template unwind is our melting temperature, so technically at that temperature, our primer can’t bind to the target. We have to set the temperature below it.”
The annealing temperature is a temperature lower than the melting temperature which facilities primer binding. Now you may wonder what exactly happens during annealing.
As I said, it’s an amplification step that allows primer-template binding at the complementary location, meaning, if the annealing temperature is calculated accurately, it will only bind to its target location.
During the process, hydrogen bonds form between the nucleotides of a primer and the DNA strand. Once the binding is assured, Taq DNA polymerase starts synthesizing the strand by using the 3’ OH end of the primer.
Ideally, the annealing temperature (Ta) should be 5ºC lower than the melting temperature (Tm), although check out the annealing temperature using the primer design software too.
It is very important to know that the GC content of the primer also influences the annealing temperature too. Higher the GC content, the higher the annealing temperature.
In order to understand this step more accurately, we have to understand what happens during higher and lower annealing temperatures.
Related articles:
- PCR Troubleshooting 102: How to Address The Allelic Dropout.
- PCR Troubleshooting 101: How to Address Non-Specific Amplification?
Too high annealing temperature:
There is a specific temperature at which primers can bind to a template, however, when the temperature exceeds primers can’t bind with their template. We will get fewer or no amplification. In most cases, a higher annealing temperature leads to ‘no amplification’.
We get truncated amplicons, immature or incomplete amplicon products in this situation. In short, results of too high annealing are either non-conclusive or no-amplification.
Too low annealing temperature:
When it comes to lower annealing, the performer has to face many problems. They may get non-specific amplification or primer dimer.
Lowering the annealing temperature in PCR can provide flexibility to primers, allowing them to bind to different positions in the DNA sequence. However, this can lead to non-specific amplification, as the primers may anneal to regions with minimal complementarity.
So first, at lower annealing, we may get many various DNA bands or unwanted amplicons. In another scenario, it binds to a similar type of sequence which has almost the same size and gives DNA bands. Such DNA bands or amplicons are still non-complimentary and hard to interpret.
Primer-dimer is yet another scenario in which primers bind to each other and form smaller PCR amplicons. Those are fragments observed between 50 to 100bp regions, however, are dimers.
In short, too low annealing temperature produces more problems than too high annealing temperature. Therefore, correct annealing has a key significance in PCR.
How to calculate the annealing temperature?
For calculating the exact annealing, we need to first calculate the melting temperature of primers. The equation for it is:
Melting temperature= 4(G + C) + 2(A + T) ºC.
For example, we have a primer, GTACATCGGCGTTTATACATAG having 22 bases.
It has 9 G/C and 13 A/T so,
=4(G + C) + 2(A + T) ºC
=4(5 + 4) + 2(6 + 7)
=4(9) + 2(13)
=36 + 26
=62ºC
So the melting temperature of this primer should be nearly 62ºC and so the annealing temperature of it might be ~57ºC or 60ºC. We have to calculate the same for another primer and tentatively find the average.
In summary, we have to put 3 to 4 temperature variations in the PCR to check the best one. Meaning, we can’t rely on a single temperature.
That’s a manual process, nowadays much more advanced and accurate online software is available that can find the best primer set as well as calculate the annealing temperature for our reaction.
Annealing time:
Besides, setting the temperature for primer binding, the time duration for annealing is indeed important. The ideal time for the step is 30 to 60 sec.
Change in time may influence results negatively. For instance, even though we have a good annealing point but performed the step for 2 minutes, it might produce non-specific bands and primer-dimer too.
Optimizing Annealing temperature:
Now coming to the interesting part of this post, how we can optimize the annealing step for multiplex PCR? Meaning for more than one template?
That’s hard, right? Because every template has a different temperature to anneal and that might not be covered in the PCR gradient. So what can we do? We can manipulate the reaction using reagents such as DMSO or MgCl2.
An appropriate amount of DMSO in the PCR reaction can decrease or adjust the annealing temperature. For let’s say, you have two reactions with 65ºC and 60ºC and you have a simple PCR machine (no temperature gradients).
Adding a pinch of DMSO in the 65ºC reaction will adjust it and can amplify the template at 60ºC.
Likewise, adding a pinch of MgCl2 increases the amplification capacity even at the higher annealing temperature. However, you need to first optimize how much amount is required.
These two articles help you to learn more:
Wrapping up:
The PCR annealing temperature isn’t the only factor that influences final results. Many things such as primer design, ingredient concentration, reaction buffer, reagents used and template quality & quantity have a definite role too. So achieving a successful amplification isn’t that much easy. One needs to have huge experience and expertise.
Playing with a PCR is fun! you know you can get many things from a single conventional PCR setup and can generate huge optimization data. If you like genetics, perhaps you have to learn PCR, even though you have to pay for it. Go to a lab near you, do internships or training and learn PCR basics.
That’s all for today’s topic, feel free to ask anything.
FAQs:
How to set the annealing Temperature in PCR?
I have already explained everything, Now I will explain this portion in steps,
First, go to Primer 3 (this URL https://primer3.ut.ee/ ) and design primers, you can get your annealing temperature there. We already have given the link for how you can design PCR primers, somewhere in the article.
Now you can check manually the annealing temperature using the equation given below.
Go to the screen of your thermocycler
- > Click on edit temperature
- >> Click on the annealing step (the middle) (shown by red error)
- >>> Click on edit temperature
- >>>> Insert the temperature value you get from the primer 3.
- >>>>> save protocol
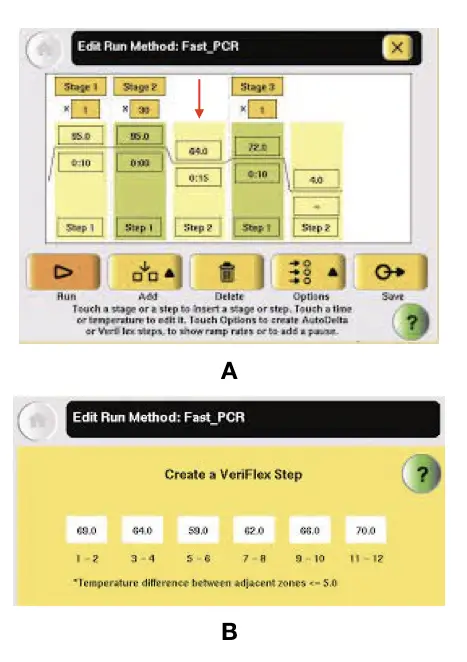
That’s how you can set the annealing temperature in PCR.
Why the need for 35 to 45 amplification cycles in rt-pcr tests for COVID-19?
By running 35 to 45 cycles we can get an accurate Ct value in the rt-PCR for COVID-19, this article will help you to learn more: What is the Ct value of SARS-CoV-2 (COVID-19) RT-PCR?
What is the best annealing temperature for PCR?
The annealing temperature depends on primer length, GC content and specificity, however, it must be between 50ºC to 68ºC, Ideally, it should be 60ºC to 64ºC. It must be 5 to 7ºC lower than the melting temperature.
What happens during the annealing step in PCR?
During the annealing step, primers bind on the template DNA at their complementary regions.

Subscribe to our weekly newsletter for the latest blogs, articles and updates, and never miss the latest product or an exclusive offer.