“DNA footprinting studies the DNA sequence protein interaction thereby transcriptional activities in vitro within or outside the cell.“
Transcription is a complex biological process whose final product is obviously a protein- a long polypeptide chain. But it involves many other factors, commonly known as transcriptional factors.
Largely, transcriptional factors are proteins and regulate the process, in which amount a particular protein is formed. Some of them are promoters, enhancers, reporters and many more.
Although each protein has a separate function, they play an important role in determining the functionality of genes at a cellular level. Transcription, as aforementioned, is a process to manufacture protein from a gene.
Differential transcription rates in different cell types produce different amounts of proteins or a totally different protein, as per the requirement of the cell. Fault in the process results either in abnormal protein/ faulty protein or loss of protein production.
This eventually results in abnormality- a visible or biochemical abnormality.
How a protein binds & interacts and where it binds on a DNA make scientists determine the overall process thereby how the genetic abnormality occurred.
Assays like DNA footprinting, gel shift and Chromatin precipitation sequencing (ChIP-Seq) assays and are several techniques used for DNA-protein binding studies among which the DNA footprinting technique is a traditional and most popular method.
Here in the present article, I will explain to you DNA footprinting, process, importance and applications.
Stay tuned.
Key Topics:
What is DNA footprinting?
DNA footprinting is a molecular genetic technique scientists use to study the protein- DNA interactions. The technique was first explained by Galas D & Schmitz A in 1978 which was a functional modification of the Maxum-Gilbert chemical sequencing technique.
Comprehensively, the overall process is as explained.
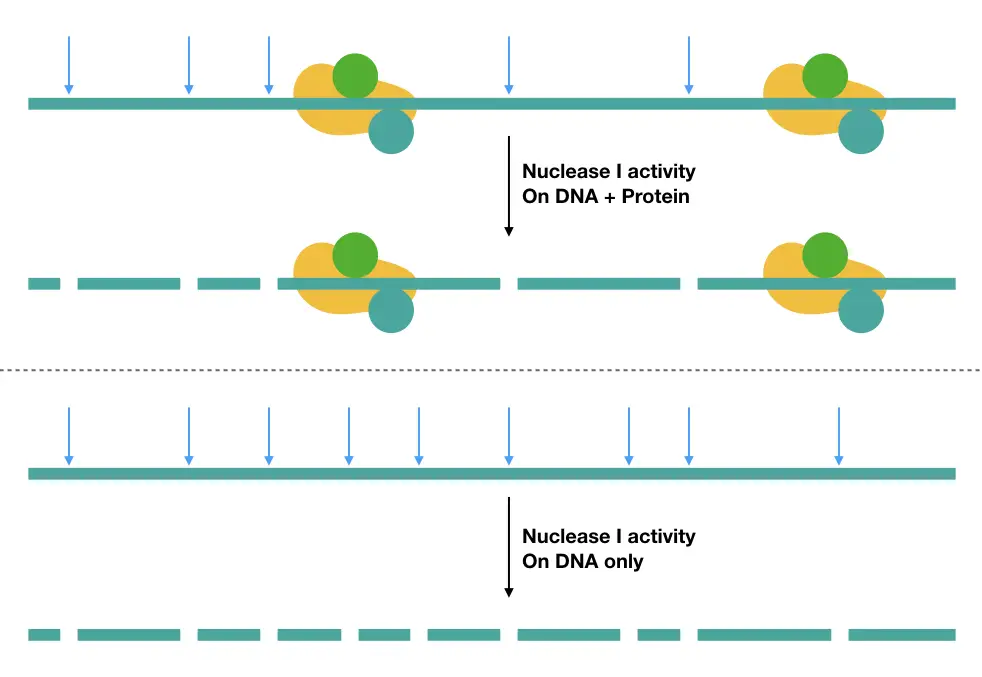
A region of DNA supposed to contain the putative protein binding site is isolated, radio-labeled and incubated with or without the protein factor followed by nuclease cleavage.
The nuclease enzyme cleaves off the large chunk of DNA in smaller fragments but not the DNA remains bound with the protein. Henceforth, in a gel, a differential banding pattern is observed for non-protein attached DNA and the protein-DNA complex.
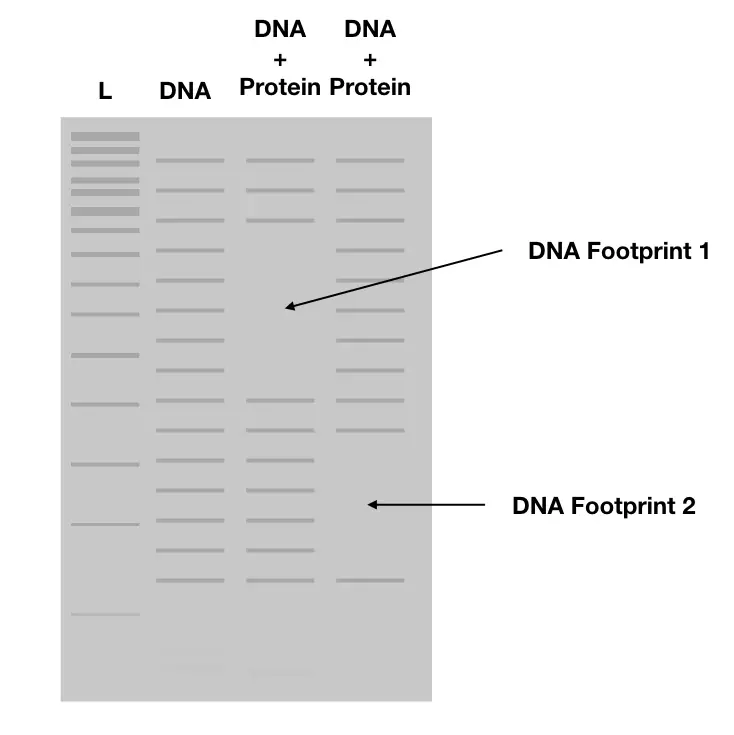
A PAGE gel result shows a large gap in the banding pattern for protein-treated DNA (which is actually a part of DNA with protein).
The gap is popularly referred to as “footprint”- produced by the interaction of the protein with the DNA. Results are examined through the autoradiography technique.
When we compare the results with a standard molecular marker or ladder by running a DNA ladder along with samples, we can determine the length & amount of DNA and site on DNA where the transcriptional factors are attached.
Related article: DNA Fingerprinting- Definition, Steps, Methods and Applications.
Principle of DNA footprinting
In layman’s terms, DNA footprinting is an inhibitory detection assay which, by PAGE electrophoresis, assesses if a particular protein, ligand or transcriptional factors bind with the DNA or not. Where DNA modifiers like DNAase or hydroxyl radicals only cut the free DNA, ligand-linked DNA remains untreated and shows a differential banding pattern in a gel as a fingerprint or gap.
Now let us understand the process in-depth.
Steps in DNA footprinting:
DNA footprinting includes
- Amplification of the region of interest
- Labeling of the DNA with radio- or flour label
- Incubation of DNA with protein and immunoprecipitation
- DNA modification by DNA modifiers
- Gel electrophoresis of DNA fragments
- Results interpretation
Process of DNA footprinting:
Let us understand the whole process in depth.
Requirements:
High-quality genomic DNA fragment of 100 to 400bp, nuclease or DNA modifier, label and Polyacrylamide gel electrophoresis.
Amplification of the region of interest:
The very first step in DNA footprinting is DNA amplification by PCR. A region of interest, supposed to have a protein interaction site(s) is amplified using a conventional polymerase chain reaction technique. It includes prior steps such as DNA extraction, purification and elution.
Labeling of DNA:
In the next step, the DNA is labeled with either radio or fluoro-molecule. The traditional method uses DNA radiolabeling, either on the 3’ or 5’ end, depending upon the location of the protein binding site. The results are observed by autoradiography through X-ray film exposure.
The fluoro-labeling process labels DNA with a fluorescent molecule and visualizes it by illumination. Either technique has its advantages and shortcomings.
Radiolabeling is a sensitive technique and can detect a small amount of DNA, hence is more accurate but on the other side is hazardous as well. The fluoro-labeling technique is safer but can’t detect the low fragments of DNA. Meaning is less accurate.
32P labeling is popularly employed and examined by autoradiography, however other DNA labeling options are also available too.
End-labeling can be achieved by amplifying labeled primers in the PCR amplification And by the enzymatical process for the cloned plasmid DNA. After either process, a few rounds of washing is performed to remove the unlabeled DNA.
Other modification techniques like DNA methylation by methyl sulfate are applied but are tedious and time-consuming.
Inoculation with protein and immunoprecipitation:
So to assess if the protein has a binding site or not, the DNA is incubated with or without protein solution. Immunoprecipitation by the protein compatible antibody is performed subsequently to differentiate protein-bound and unbound DNA.
Antibodies link with the protein and precipitate it whereas the free DNA remains as it is and is removed by washing.
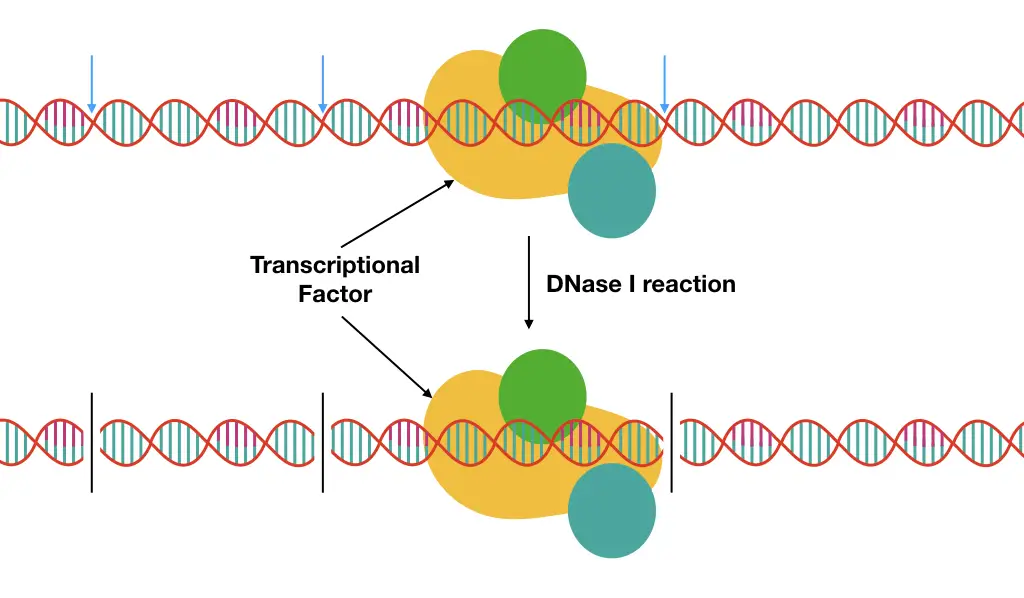
DNA modification by DNA modifiers:
DNase I is an enzyme popularly applied as a modifier to digest DNA. The goal is randomly cutting the whole chunk of DNA into fragments. Other agents like hydroxyl radicals, UV light and mechanical cutting techniques are available options besides DNase.
On a technical note, the modifier or cutter produces so many cuts in non-(protein) incubated DNA but less in protein incubated DNA, as a large portion is occupied by the protein interactions. The figure below, explains more.
Now let us understand how each DNA modifier works, separately.
DNase I:
The DNA nuclease enzyme or DNase I cleaves off dsDNA precisely. DNase I bind to the minor DNA groove upon incubation with the DNA. The enzymatic activity breaks phosphodiester bonds on both the strands and separates the DNA.
It works on many sites and produces many fragments of DNA which makes it the most effective nuclease or DNA modifier so far. Other than this, another major benefit of DNase I is that it can be controlled.
By adding DNase suppressors like EDTA or EGTA, catalytic reactions can be governed. It is easy to use and available commercially with many variants. You can read this article to learn more on DNase.
What is DNase?- Definition, Structure, Function and Types
UV light:
Yet another excellent and well-studied DNA modifier is UV light. UV light directly damages DNA bases and produces many cuts in target DNA. Notedly, as it also constitutes DNA protein cross-linking, an additional step is required to distinguish treated and non-treated DNA.
A primer extension step, in which a primer DNA extends and terminates when it finds the cut or damaged base, is visualized on a gel. However, results produced by UV-mediated DNA footprinting are difficult to interpret as it shows extra bands like protein DNA crosslinking and smaller fragments.
Nonetheless, the greatest advantage of the present technique is that it can be used effectively for in vivo experiments and modifying DNA directly from a cell as it can easily penetrate the cell membrane.
UV light is dangerous for us and shows substantial carcinogenicity, so less advised. In addition, the banding pattern produced is more uneven too.
Hydroxyl radicals:
Fe2+ and H2O2 like hydroxyl radicals are also great options to modify DNA for producing DNA footprints. Unlike the UV light, the banding pattern produced here is more even and understandable.
They are less employed as it involves time-consuming processing and a slower reaction rate.
Note that DNA modifiers have a crucial role in the present technique so selecting an agent is empirical. The cleaving agent or modifier should be easy to use, quick, effective, cheaper and most importantly should provide a high resolution and even banding pattern.
Analysis of results by PAGE
PAGE- Polyacrylamide gel electrophoresis is a standard technique to investigate DNA footprinting results having a higher resolution banding pattern up to a single base pair. Meaning, it can detect a change in the DNA as small as a single nucleotide.
Along with a standard-sized DNA ladder, protein incubated and non-incubated samples are loaded on a gel, after digestion. At the end of the run, a differential banding pattern is observed.
The results are observed using autoradiography, traditionally or through illumination showing a gap- “footprint of DNA” in protein incubated DNA samples if a binding site is present.
Notedly results also contain many footprints which largely depend on the length of the DNA and how many protein binding sites it may have.
Interpretation of results:
A DNA footprint on a gel only gives us an idea about the presence of the binding site(s), further investigations are required to collect more information. Such examinations are computational sequence analyses.
The sequence information of both treated and the non-treated sample is collected and by locating the start and end site, the exact location and the length of the protein putative interaction site is investigated.
If we know what transcriptional factor we have used, and incubated with different genomic regions, scientists get an idea about the number of binding sites for that particular protein in the genome.
Moreover, using different types of transcriptional factors, the binding affinity of a single particular DNA fragment for various proteins or transcriptional factors can also be determined.
Applications of DNA footprinting:
The classic application, the present technique has is to study protein-DNA interactions. This means that the site, where a particular factor binds can also be assessed and determined.
By doing so the transcriptional regulation and gene expression processes can be studied.
The location of various transcriptional factors like promoters, enhancers and regulators can be located, effectively.
It can also be used to identify the function piece of sequence from the genome.
Recent advancements also show that hormone response elements and their binding to specific sequences can be investigated.
It also facilitates drug-DNA or ligand DNA interaction studies too.
Advantages:
- The present technique is powerful enough to differentiate many fragments.
- It can exactly locate the binding site of the particular ligand.
- The present technique is comparatively cheap.
Disadvantages:
- The present technique is conventional, time-consuming and laborious.
- It is less accurate and non-reproducible.
- The banding resolution is also very low.
- Not so robust
- Radioactive use is hazardous for health
Recent advancement:
As aforementioned, although DNA footprinting has lucrative applications in molecular genetics, it comes with serious drawbacks.
Recent automation explained by Yindeeyoungyeon & Schell, 2000 suggests that the use of fluorochrome, ready-to-use DNA extraction & purification kit and capillary electrophoresis increases banding resolution, accuracy and safety, also, is robust and rapid.
Autoradiography, like tedious steps, isn’t involved here. Capillary gel electrophoresis is a highly sensitive and robust technique that can differentiate a single base difference accurately.
Chip-Seq is yet another method based on the immunoprecipitation technique that directly sequences the DNA attached with a protein/chromatin/ transcriptional factor.
Some researchers also use gel shift assay too which illustrates differences in the mobility of protein-linked and non-linked DNA under electrical current. Nonetheless, these techniques are insufficient in providing more data.
Moreover, other genome-wide techniques like DNase-Seq or FAIRE-Seq investigate protein- DNA interactions on a large scale, throughout the genome.
Wrapping up:
DNA footprinting studies epigenetics and gene expression which is indeed an important factor for producing variabilities. Chromatin interactions with proteins, ligands or hormones alter the structural stability of DNA as well as its functionality greatly.
The euchromatin to heterochromatin and vice versa conversions are regulated by proteins or transcriptional factors that can be studied through DNA footprinting.
Sources:
Yindeeyoungyeon, W., & Schell, M. A. (2000). Footprinting with an automated capillary DNA sequencer. BioTechniques, 29(5), 1034–1041. https://doi.org/10.2144/00295st05.
FAQs: