“Understand the thermocycler machine, parts, setup, errors, and troubleshooting and essential maintenance tips in this beginner-friendly students’ guide.”
PCR (Polymerase Chain Reaction) is widely used in the field of life sciences for amplifying DNA. Hence, has been instrumental in genetics, biotechnology, microbial detection, disease diagnosis and various other fields.
You can think of it as the ‘heart’ of any genetic research experiment. Any downstream analysis has a PCR step midway! The PCR machine is known as the thermocycler. A machine that is instrumental in conducting amplification.
So a thermocycler is a PCR, right? What’s new in that?
Well, let me tell you that the PCR is a reaction— polymerase chain reaction, a technique that we use to perform DNA amplification, whereas the thermocycler is a machine.
So yes! There is a difference between a thermocycler and PCR itself. But that’s not the point, we are going to discuss in this article. Our main focus in this article is to understand the machine— the thermocycler, and not the PCR!
As a beginner student or experienced peer, you need to know the machine, its components, how it works, what’s inside, what the common problems are, how to troubleshoot them, and how to do routine maintenance.
Understanding these points prevents instrumental breakdown and improves its shelf life. And that’s what we want.
In this complete student’s guide, I will explain the thermocycler, keep in mind, not PCR! and we will cover all the fundamental aspects that students should need to know.
Want to become a good scientist? Let’s get started.
Key Topics:
What is a thermocycler?
A thermocycler is a machine that performs heat cycles (Thermo + Cycler). In 1980, the first thermocycler, known as the “Mr cycler,” was developed. Engineers at Citus Corporation started developing the machine after the PCR had been conceptualized by Kary Mullis.
The first functional prototype, the TC1 DNA Thermal Cycler, was introduced by Perkin-Elmer in 1987. The whole idea for the machine is to provide repeated heating and cooling steps with rapid temperature change.
Scientists immediately understood the importance of the PCR, leading to rapid innovation in the technology. What began with a basic instrumental setup and a digital display has now advanced into a fully automated and Wi-Fi-enabled machine.
Perkin-Elmer, Thermo Fisher, Bio-Rad Laboratories, Roche Diagnostics, Applied Biosystems, Qiagen, Eppendorf and Agilent Technologies are the major providers of different types of PCR machines.
What does a thermocycler do?
DNA can be modified using temperature. At various temperatures, various DNA manipulations can be performed. We can denature the double-stranded DNA, anneal a sequence and perform synthesis at different temperatures.
The principle of PCR revolves around this concept. By providing various temperature zones, the DNA copies can be generated.
| Step | Temperature | Purpose |
| Denaturation | 94- 98ºC | To denature dsDNA |
| Annealing | 52 to 68ºC | To anneal primers |
| Extension | 78ºC | To perform synthesis. |
| Repetition | 30-35 cycles |
The thermocycler is a laboratory instrument providing repeat temperature cycles to perform a PCR (denaturation, annealing and extension) and amplify the DNA; therefore, it is commonly utilized in life science, molecular biology or any biological lab.
To know more about PCR, you can read our previous guide.
Thermocycler Components or Parts:
Now! To master the thermocycler and PCR, you first need to know the machine, what components and parts the machine is made up of. Common parts of the machine are the opening lid, sample block, heating coils, display and power button.
Other parts that may vary from machine to machine are the digital or touch display, air vents, USB port and upper and lower heating coils.
Check out the labeled thermocycler diagram first.
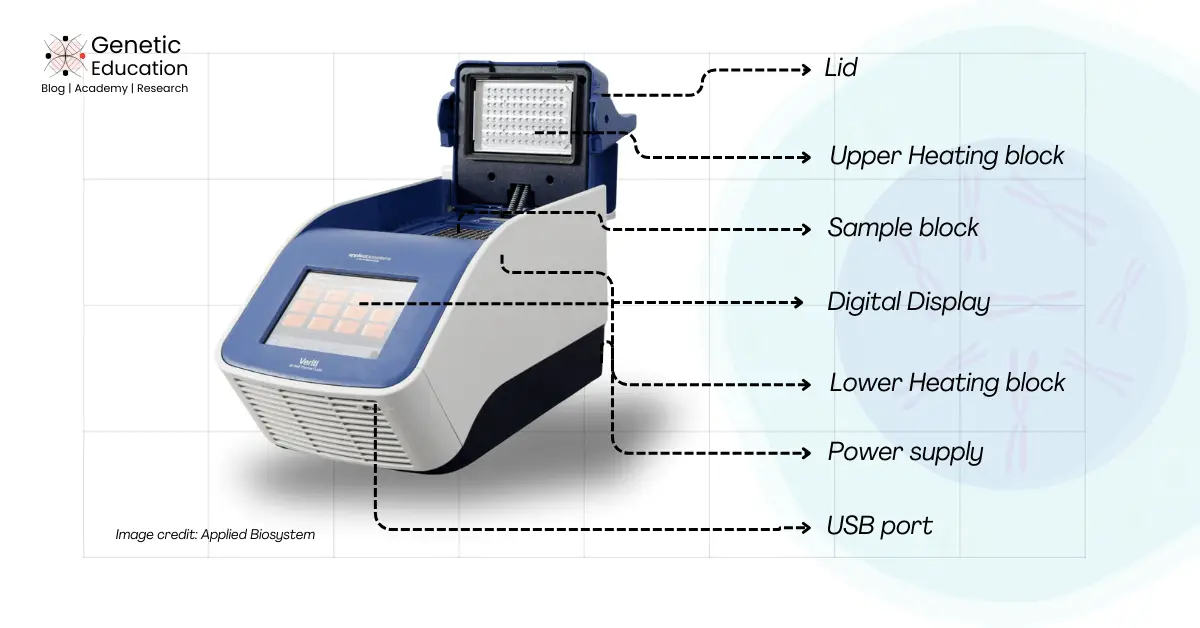
Sample block:
A sample block is a temperature-sensitive metal block in which we place our samples for amplification. We can put either the sample tubes, PCR strips or a 96-well or PCR plate directly.
Depending on the capacity of the machine 24, 48, 96, or so on, samples can be placed in the sample block.
Heating coils:
Heating coils are the main components of the thermocycler, as they provide heat to the samples. Generally, two heating coils, one on the bottom of the sample block and another on the front, in the lid of the machine, are present.
Lid:
A lid with a handle or lid closure protects the reaction by covering the sample block. Lid design may vary among companies, but they serve the same function.
Display:
Either a digital display or a touch screen is now available, depending on the thermocycler model. It provides navigation to operate the machine, set up runs and make modifications.
It’s just like our cell phone display; by running the program, we can use it. The display here serves the same function. No need to explain how it works or how to operate it, I guess!
Air vents:
Air vents play a significant role as they help cool down the machine during the run and pass the air out of the system. Two sets of air vents, one on the front or another on the sides, are usually present.
USB port:
There is a dedicated USB port provided on the thermocycler machine to import and export data and to perform validation and calibration. The port placement may vary from the front to the side to the back of the machine.
Power button:
Lastly, one dedicated power button is also given on the back of the machine to turn it on and off.
Note that the machine is also equipped with a basic operating system and some pre-installed programs that we can directly use.
How to set up the thermocycler?
To set up the thermocycler at your lab, several setups should be performed before your first run. You need to set up the machine > connection > wireless connection > create a user’s profile > link the machine > create a method.
- Once you receive the machine, unbox it and place it on a solid surface where you want to set it up.
- Connect the machine using the supplied power cable and plug it into an electrical outlet.
- Now, switch on the power supply and then turn on the machine. You will now see a welcome display.
- After that, all other setups, calibrations and installations are generally performed by the company representative, but you just learn the process.
- The representative will set up the wired and wireless connection, input the IP address and connect the instrument with the server.
- Now, you can create a user’s account and then start preparing the method.
- In the methods section, you can choose the pre-built protocols or set up your own. It is as easy as doing it for a mobile app.
- Now our machine is ready to run!
Note: steps and setup modules may vary from company to company, but the basic elements of the display and functions remain the same.
Types of Thermocyclers:
Next, you need to know how many different types of thermocycler machines are available in the market, and what is yours! This is important to use it to its full potential.
Simple thermocycler:
A simple or conventional thermocycler is a basic machine in which you can set up a single experiment with a single annealing temperature. It usually doesn’t have many functions and facilities.
The machine is available with a simple digital display in 24, 48 and 96 sample formats. It is ideally used for high school or bachelor’s level experiments for educational purposes.
It can’t be instrumental for research as it doesn’t have the functionality to optimize the protocol.
Gradient Thermocycler:
Gradient PCR has been extensively used in research as it provides various temperature gradients for testing.
We can test different annealing temperatures in different sample zones, in a single experiment. Such an application helps to standardize the annealing temperature and concentration of reagents for the reaction in a single experiment.
Real-time thermocycler:
The real-time thermocycler is a bit different than the conventional PCR machine. It is equipped with additional components and programs to monitor the amplification reaction.
It monitors the reaction in real-time and provides us with template quantification data. It is widely used in microbial research and gene expression studies.
Portable thermocycler:
The portable thermocycler is a small-sized and low-weight mobile PCR machine. It can be carried in the field and used to perform amplification anywhere with its ready-to-use kit setup.
However, it has a limited capacity and accuracy.
Related articles:
- [Review] QIAcube HT Automated Nucleic Acid Extraction Unit
- [Review] Comparison Between Qubit vs. Nanodrop Lite
- Our Honest Review on Qiagen QIAXpert
Handling errors and troubleshooting
The thermocycler is a complex and constantly lab instrument. An error may break down the machine. However, by following the present guide, you can identify the error, troubleshoot it and ask for help.
This practice is important to prevent machine breakdown.
Error or warning:
When a machine shows an error or warning, that means the machine is facing a problem and isn’t working right. There might be hardware issues or the temperature sensor may be out of calibration.
Immediately, stop the run; if the machine is running, don’t wait for the run to complete. Perform a self-validation test or call the service provider.
Screen stops working:
In case the screen stops working or doesn’t appear, there are high chances that the screen is damaged or the fuse is blown.
Check the electricity connection or fuses and restart the machine. In case of no physical damage, this can be the main reason.
Tubes or plates melted or crushed:
If your PCR tubes or plate get melted or damaged during the run, there is a problem with the temperature, lid or the quality of the plastic material.
Always use quality and recommended tubes and plates. In case the machine is overheated, turn off the machine and get help from a service representative.
Network error:
The thermocycler is connected to the company server via an IP address. Hence, it has a dedicated machine IP address. In case of network disconnect, IP conflicts, power off or remote access denied, a network error is shown.
Turn off the machine, correct all the cable connections, and restart it. If you have some technical knowledge, check the IP address; you will get this information in the settings tab.
Still, you face the problem; keep in mind it isn’t a major one, call the service provider.
Heat-lid stuck:
We need to open and close the lid many times. Sometimes, due to mechanical failure, the lid gets stuck. It isn’t a serious technical problem, you can call the service provider and have it repaired.
Power failure:
Power failure interrupts the run and turns off the machine immediately. This can damage the machine or influence the machine’s working if it occurs often. Turn off the switch immediately if a power cut occurs.
Once the power comes back, you can turn it on and resume the run.
Reaction failures:
If reaction failures occur frequently, even with the standard protocols, or the temperature changes abnormally, that means that the temperature device, heating coils or temperature sensors are damaged or need calibration.
Call the service provider to recalibrate it or repair it.
Summary:
| Error name | description | criticality | Impact on reaction | Troubleshootings |
| Machine Error/Warning | Shows an error or warning due to hardware or sensor issue | High | Run may fail or stop unexpectedly | Stop the run → Perform self-test → Call service |
| Screen Not Working | Display is blank, break or illegible | Medium | Cannot operate machine if screen is dead | Check power/fuse → Restart → Call service if not solved |
| Tubes/Plates Melted | Plastic tubes/plates melt or deform | High | PCR reaction ruined, contamination risk | Use correct tubes → Turn off machine → Call service |
| Network Error | Machine can’t connect to the network | Low | No effect on reaction, but affects connectivity | Check cables/IP/settings → Restart → Call service if needed |
| Lid Stuck | Lid doesn’t open/close properly | High | May damage tubes or affect heat distribution | |
| Power Failure | Power cuts off mid-run | Medium | Run interrupted, machine risk with frequent cuts | Turn off switch → Resume when power returns |
| Reaction Failures | Reactions fail repeatedly without protocol issues | High | Inaccurate results or failed amplification | Call service for calibration or hardware repair |
How to do basic thermocycler maintenance?
The Thermocycler in your lab is your responsibility. Up to this, you learn about the machine, types and basic problems and troubleshooting, why not learn the basic maintenance, to prevent machine damage or breakdown.
Let’s do that.
- Always place the machine under air conditioning between 20ºC to 25ºC for stable performance, and prevent heat damage to the mechanical parts.
- This also prevents the machine from overheating, after all, it is an electronic device.
- Always cover the display to prevent dust or damage, and remove the cable from the electricity socket after the run is completed.
- Now, clean the machine, each part one after another, to prevent contamination.
- First, clean the wells with an alcohol-dipped cotton swab, then clean the lid and the platform.
- Avoid cleaning the display or buttons.
Note: Before cleaning, allow the machine to cool down. During the run, the temperature inside the machine is as high as 110ºC, which can cause burns or capture fire during alcohol cleaning.
- Do not clean any part with water directly.
- Use a good quality cotton cloth to clean the display. Don’t push or pressurise the display; do a gentle cleaning.
- Timely calibrate temperature sensors and other mechanical parts of the machine.
- Keep regular firmware or software updates.
- Maintain daily thermocycler activities, breakdown, error and reaction failure log.
- Run a self-test or validation program once a month, if provided by the company.
Wrapping up:
Thermocycler has an important role in molecular genetics and revolutionized the DNA testing industry due to its high accuracy and potential to generate millions of amplicons.
By knowing the machine, understanding the problems and doing common maintenance, you can use your thermocycler for a longer period of time without compromising the performance.
I hope you like this article. Do subscribe to Genetic Education. Happy PCR!