“Explore this advanced guide to set up the DNA extraction lab for research, diagnosis and other activities. Learn about the requirements and utilities needed.”
The basic DNA extraction setup used for strawberry and banana DNA extraction at a school level isn’t sufficient for research or diagnosis.
Advanced and state-of-the-art instrumentation, highly pure chemicals and reagents, strict lab SOPs and quality control are needed to isolate good-quality DNA. However, the exact protocols and several utilities may vary among sample types.
If you’re facing difficulties in setting up a DNA extraction lab, here is the article for you!
This is a complete guide for peers, researchers and diagnostics to set up an advanced DNA extraction facility at their doorsteps. We will cover three different types of setups, instruments, chemicals, solvents and utilities needed, and common workflow and SOPs.
Stay tuned.
Key Topics:
A General overview of a DNA extraction lab
DNA isolation is a primary and important step in any genetic experiment. Excellent DNA yield and quality have been pivotal for achieving good downstream results. Hence, this step is mandatory for almost all molecular experiments.
In the era of AI and automation, varied options are now available for lab setups as well. Three different DNA extraction lab options are now available for three different groups of peers.
| Target audience | Advantages | Limitations | |
| Manual DNA extraction | High school and low-budget college research facilities | Cheap and effective | Labor-intensive, time-consuming and error-prone |
| Kit-based DNA extraction | Advanced and sophisticated research facilities | Accurate, fast, safe and high-yield | Costly and limited scope. |
| Automated DNA extraction | Diagnostic labs | High throughput and fast | Super costly |
Manual DNA extraction facilities:
Manual DNA extraction facilities are beneficial for high school and low-budget college research facilities. Here, all the steps are performed manually, including reagent and chemical preparation.
This is the cheapest and most effective setup to get a good amount of DNA and many college-level research facilities are using it. However, it is labor-intensive, time-consuming and error-prone.
Chemicals like phenol and chloroform also raise safety concerns. Still, a well-established and optimized workflow and SOPs always yield good results, year after year.
Kit-based DNA extraction facilities:
Spin-column kit-based DNA extraction has been widespread nowadays due to its efficiency, accuracy, speed and ease. It is a simple four-step method requiring minimal chemical preparation, instrumentation and utilities.
The kit includes almost all the utilities, excluding only a few instruments. Despite its widespread use, it is a costly and limited-scope option for students. Meaning, a single kit can’t be employed for all sample types.
Still, it provides uniform extraction results without additional optimization or standardization.
Automation in DNA extraction:
Automation is highly recommended for diagnostic and sophisticated labs. All the extraction steps have been performed by an automated extraction unit without human interference.
For instance, QIAcube HT, an automated DNA extraction unit from QIAGEN, is the first choice for labs to establish an automated and streamlined workflow. We already reviewed it. Click the link to read the review.
Automation allows high-throughput analysis with uniform and high DNA quantity and quality. However, it is super costly. Colleges can’t afford it. So it is extensively used by diagnostic facilities.
Contrary, diagnostic facilities have a high sample load and limited manpower. Automation helps high-throughput extraction without compromising the quality.
Instrumentation for a genetic lab:
Check out the table first for the instrumentation required by all three types of DNA extraction labs.
| Manual setup | Kit-base setup | Automated setup |
| High-speed cooling centrifuge | High-speed cooling centrifuge | – |
| Water or dry bath | Water or dry bath | – |
| Vortex | Vortex | – |
| Weight balance | – | |
| pH meter | – | |
| Gel electrophoresis unit | Gel electrophoresis unit | Gel electrophoresis unit |
| UV transilluminator | UV transilluminator | UV transilluminator |
| Magnetic stirrer | – | – |
| Spectrophotometer | Spectrophotometer | Spectrophotometer |
| Fluorometer (optional) | Fluorometer (optional) | Fluorometer (optional) |
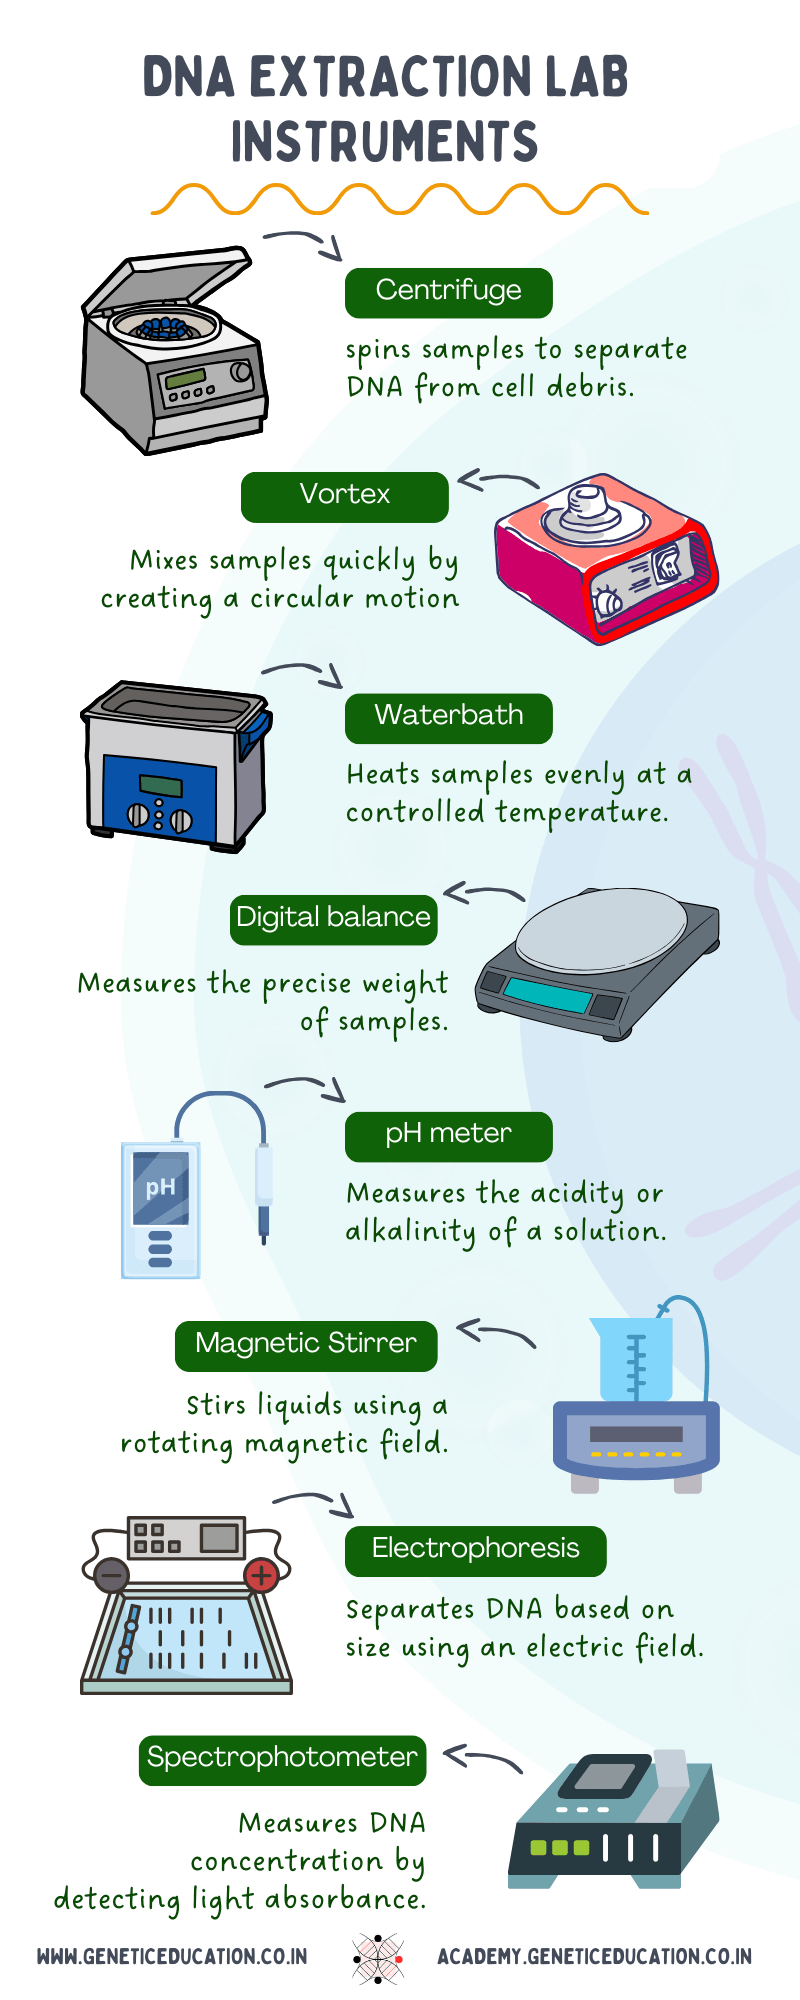
Let’s briefly explain the function of each instrument.
Centrifuge:
The centrifuge is instrumental in separating biological molecules at high speed. Pure nucleic acid can be eluted into the aqueous phase while the cell debris is collected into the pellet.
A centrifuge is required in manual and kit-based DNA extraction facilities, but not in automation.
Vortex:
The vortex is used to mix the sample, solution or chemicals by gentle shaking. It is a smaller-sized instrument that is required in manual and kit-based DNA extraction, but not in automation.
Weight balance:
A weighing/digital balance is important for a manual DNA extraction facility, as all the chemicals should be weighed to prepare buffers and solutions. It should be commonly present in all molecular labs.
pH meter:
DNA is pH sensitive, so during chemical preparation, adequate pH should be maintained. pH is an important instrumental requirement for the manual DNA extraction lab.
Kits and automation don’t need chemical preparation, they also don’t need a pH meter.
Magnetic stirrer:
This instrument helps stir or mix two different chemicals. Therefore, it is needed for the manual extraction lab. For instance, magnetic stirring is needed to prepare the saturated phenol during the PCI protocol.
Electrophoresis unit:
To validate the extract, an electrophoresis unit is needed to run the DNA. It is also used for PCR and restriction digestion analysis. It is a common molecular lab instrument.
UV transilluminator:
This instrument is employed to visualize the DNA and is a common lab apparatus.
Spectrophotometer:
A spectrophotometer is extensively used in DNA extraction to check the quality and quantity of the DNA. For example, the Nanodrop Lite. It is a significantly important instrument for a molecular lab.
Fluorometer:
A fluorometer is also used to measure the quantity of the extracted DNA, but it is optional.
Chemicals for the DNA extraction lab:
70+ different chemicals can be used during different stages of DNA extraction. Broad categories of DNA extraction chemicals are: buffers, detergents, salts, and alcohols.
Check out this table to know more.
| Chemical category | Chemicals | Manual DNA extraction | Kit-based DNA extraction | Automated DNA extraction |
| Buffers | Tris-HCl, TE, STE, SSC, MES and PBC | ✔️ | ✔️ | ❌ |
| Detergents | SDS, CTAB, NP40, Chelex 100, Twin20, CHAPS, Sarkosyl, etc | ✔️ | ❌ | ❌ |
| Salts | NaCl, KCl, LiCl, MgCl₂, CaCl₂, Sodium acetate, Guanidine isothiocyanate, etc | ✔️ | ❌ | ❌ |
| Alcohols | Isopropanol, ethanol and methanol | ✔️ | ✔️ | ❌ |
| Enzymes | Proteinase K, RNase, DNase | ✔️ | ❌ | ❌ |
All these category chemicals are required for a manual DNA extraction lab. However, only buffers and alcohol are additionally needed for kit-based extraction. No additional chemicals are required for the manual extraction.
Utilities:
Common utilities for a DNA extraction lab have been discussed in the table below.
| Utilities | Manual DNA extraction | Kit-based DNA extraction | Automated DNA extraction |
| Common glassware | ✔️ | ✔️ | ✔️ |
| Common plasticware | ✔️ | ✔️ | ✔️ |
| Micropipettes | ✔️ | ✔️ | ✔️ |
| Eppendorf tubes | ✔️ | ✔️ | |
| Refrigeration | ✔️ | ✔️ | ✔️ |
| Deep Freeze | ✔️ | ✔️ | ✔️ |
| Tips, tubes, racks and stands | ✔️ | ✔️ |
These are the common utilities for a molecular lab however, automation separately does not need the micropipettes and associated utilities, as all operations are performed in the closed system.
In addition, for short and long-term DNA and chemical storage, refrigeration and a deep freezer are also required in a DNA extraction lab.
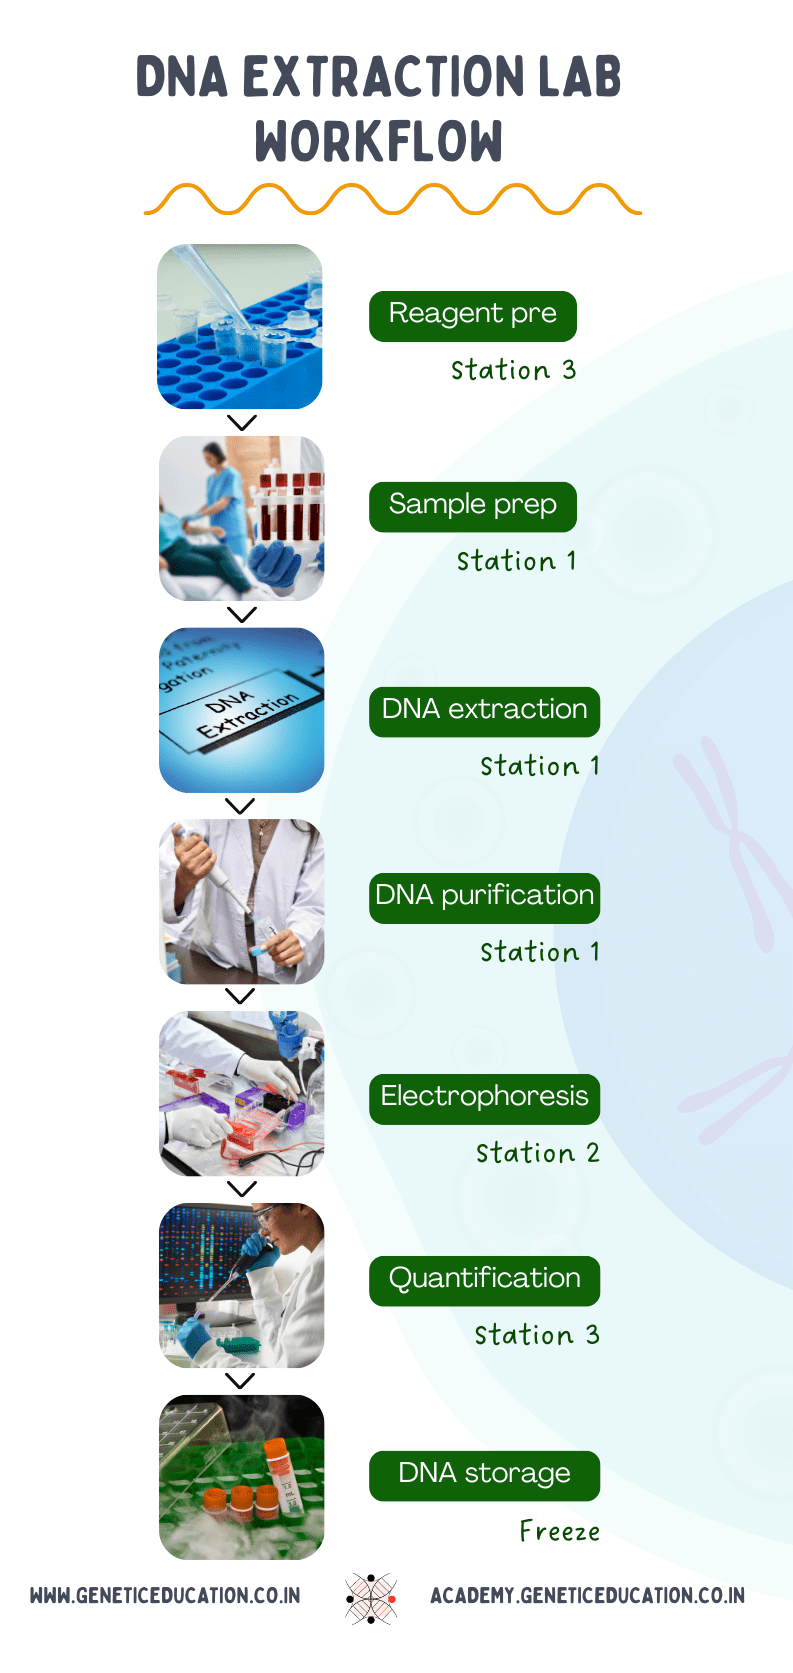
Workflow:
Any molecular lab or sub-department should follow the unidirectional sample processing, as per the international guidelines for DNA testing. For instance, once the sample for extraction reaches the testing facility, it should not go back at any stage.
The testing workflow is crucial for reducing the likelihood of contamination and ensuring reliable and accurate results.
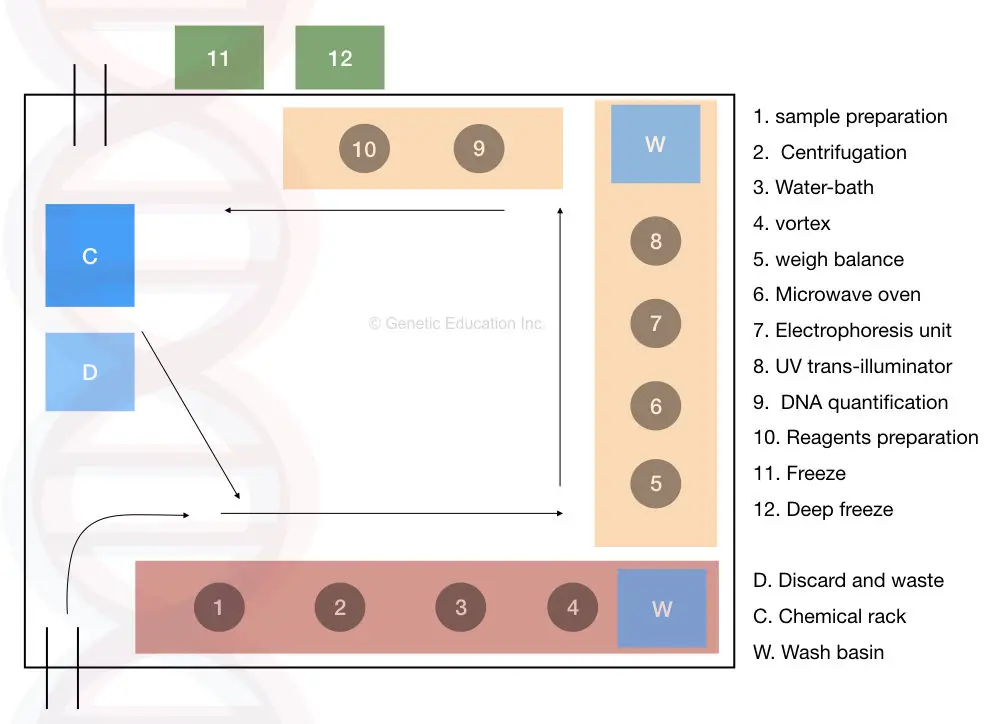
To follow the international testing standards, every instrument, utility and setup should be as per the guidelines. Here in the diagram, I showed the complete unidirectional workflow for a DNA extraction lab.
We divided the entire place into four different workplaces.
The first workstation is only for extraction, no chemical preparation or post-processing. Centrifuge, vortex and water or dry bath are placed here. A small dedicated place is reserved for sample preparation as well.
Next, we have an electrophoresis setup (5 to 8). Weight balance, electrophoresis apparatus, oven and UV transilluminator are placed here. Fragment separation has been performed here, after the extraction.
The very next workstation is for reagent preparation and quantification (9-10). It is used to perform DNA quantification and prepare reagents and mixing solutions.
The lab should also have a separate place for waste disposal and chemicals. A dedicated waste disposal and chemical rack should also be placed in the lab.
The refrigerator and deep freeze are placed separately.
So the workflow is first the sample preparation station (1 to 4) > gel electrophoresis (5 to 8) > reagent preparation and quantification (9 and 10) > waste disposal and chemical racks > refrigerator and deep freeze (11 and 12) outside the lab.
The washing area should also be present at one corner of the lab to wash the glass and plasticware, drain chemicals and wash hands.
Note: You can also use a Laminar Air Flow/ extraction hood or biosafety cabinet for DNA extraction or separate the RNA extraction to avoid contamination.
Common suggestions:
- Always follow Do’s and Don’t for genetic lab safety. I already wrote an article on this. Click the link to read it.
- Prepare separate SOPs for chemicals, instruments and utility handling. This will streamline the workflow and improve efficiency and accuracy.
- Maintain registers and records. This also ensures the quality of extraction.
- Follow the pre- and post-extraction SOP strictly to ensure a streamlined workflow.
- Store DNA samples at or below -20°C or follow standard DNA storage and handling procedures.
- In addition, define your goal before setting up the lab, whether your lab is for college, research or diagnosis and choose the modules accordingly.
Wrapping up:
Setting up a DNA extraction lab isn’t that difficult, if you have a thorough knowledge of all the chemicals, instruments and utilities used. DNA extraction is a crucial step in molecular genetics and thus all the downstream analysis highly relies on how we extract the DNA.
So always follow standard protocols and SOPs to ensure better results. If you want any help setting up your DNA extraction or any genetic lab, you can contact us. and my team will help you.
I hope you like this article.
Typically what would be the cost to set up one? Thanks
That depends on the setup
want to get the detail project report to set up genome sequencing,
Do you want to set up a DNA extraction lab?
yes i need to set up