“Blood is the common tissue for genomic DNA isolation and is widely used in medical and clinical testing as a main source of a sample as it’s easy to transport and handle. Let’s see how we can extract DNA from blood.”
DNA can be extracted from any body tissue having nucleated cells. DNA is our genetic material and carries information regarding our health and different disease conditions. So DNA testing reveals much health-related information.
The adaptation of DNA testing techniques like PCR, DNA sequencing and microarray in medical and clinical setups brings molecular testing to a new measure. Where other bodily samples are often tested for various purposes, blood is the most common sample type.
Blood is easily available and thus is a soft target for routine DNA extraction, especially in the diagnostic industry. There are many kits available to isolate genomic DNA from blood and protocols too.
None of the protocols are easy as the whole genomic DNA extraction scheme is a sensitive and tedious process. So common problems here are getting DNA with good quality, quantity and integrity from various blood samples like- whole blood, dried blood spot, and clotted and frozen blood.
So how can it be done? How effectively can we extract DNA from such samples? I have years of experience working with blood DNA extraction and testing and have tested many kits and protocols too. I have a keen knowledge of how each method works and what methods work best in different conditions.
So trust me, I and my team are the best at explaining this topic.
This article would become a one-stop destination for you to learn genomic DNA extraction from blood. And explains the principle, steps, process, protocols, kits, advantages and disadvantages of the blood sampling process and DNA extraction.
Stay tuned.
Key Topics:
Introduction to Blood DNA Extraction
Blood is a liquid connective tissue and made up of solid and liquid components. Where liquid mostly is plasma, consisting of water, proteins and salts; red blood cells, white blood cells and platelets are solid constituents of the blood.
Blood, broadly speaking, provides oxygen to various bodily organs and tissues, however, only white blood cells have nuclei viz DNA. Red blood cells lack nuclei and DNA and therefore our main target for DNA extraction is white blood cells (WBCs).
Anucleated platelets lack genomic DNA, and hence, also not useful for DNA extraction. Unfortunately, we lack knowledge about who first used blood to extract DNA and who first isolated DNA from the blood.
A few good reasons why we use blood to extract DNA are,
- It’s easily available.
- It circulates to each part, organ and tissue of the body.
- The blood sample collection method is less painful and complicated.
- It’s easy to store, process and transport blood samples.
- Blood is produced naturally in the human body, so sampling can be repeated.
- Blood contains a huge amount of nucleated white blood cells which makes genomic DNA isolation easy.
Adding to this, blood is also used to test other biomolecules and study complicated health conditions and diseases too.
Principle of Blood DNA Extraction
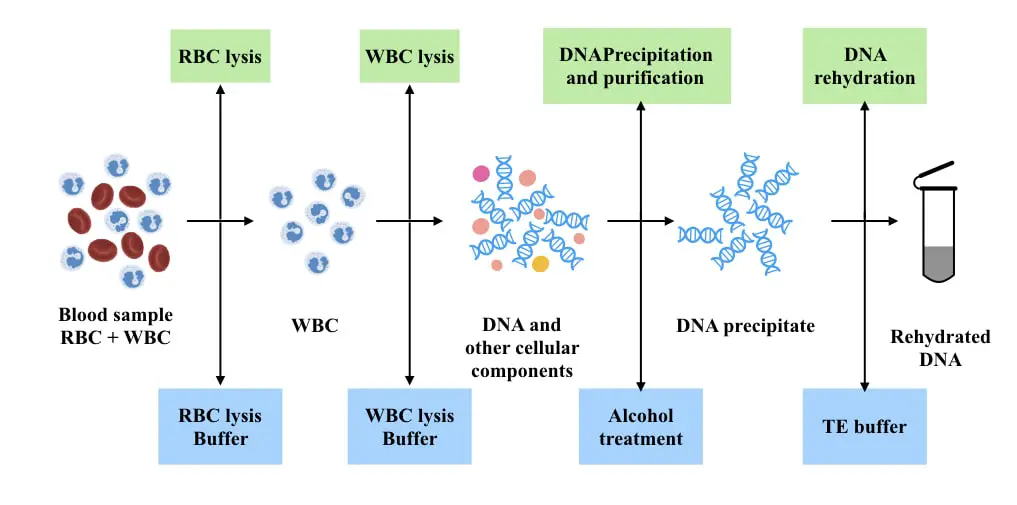
“The White Blood Cells are lysed following the Red Blood Cells in the very first steps using detergents, salts and chemicals. The released DNA is isolated, precipitated, purified and dissolved in the TE buffer.”
There are two ways to perform it.
Two-step lysis
In the two-step lysis, the lysis of RBCs and WBCs occur separately. First, the RBCs lacking the nucleus are lysed during extraction and removed using detergents like SDS or commercially available Triton X100.
In the next step, the lysis buffer lysed WBC and releases DNA. Afterward, the conventional DNA extraction steps like purification, precipitation, washing and elution are performed.
One-step lysis
In the one-step lysis technique, the lysis of RBC and WBC is performed in a single reaction using chemicals and detergents. The rest of the steps afterward will remain the same. The two-step lysis is superior to the one-step method as early and separate lysis of RBC will no longer interfere with consecutive steps.
Note that this is the principle of blood DNA extraction, the principle of the main topic, “DNA extraction” is a bit different.
How to Extract DNA from Blood?
Here are the 7 steps for DNA isolation from blood.
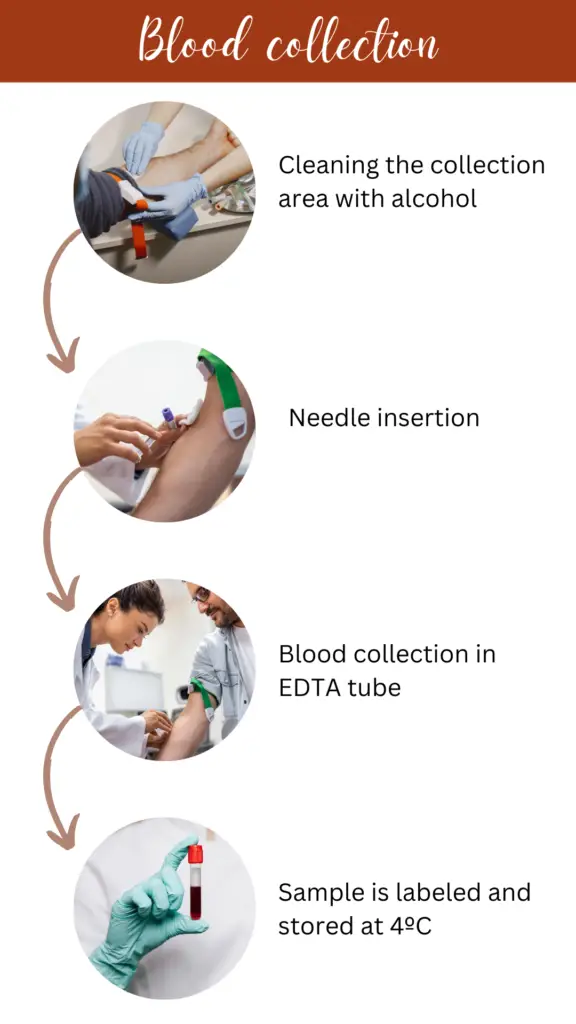
Step 1: Sample collection
Blood sample collection is a crucial scheme for DNA extraction. 2 to 5 ml of blood is collected in the EDTA tube from the vein of the arm (under aseptic conditions). Also, the sample is aseptically transferred to the EDTA tube, stored or transferred at 4°C temperature.
Step 2: Removal of RBC
RBCs are non-nucleated blood cells that carry and transfer oxygen. To effectively isolate genomic DNA, RBC must be lysed and removed first. The blood sample is treated with an RBC lysis buffer. The buffer should have EDTA, sodium bicarbonate, ammonium chloride and other ingredients.
Lysed RBCs are removed by centrifugation. The Protein part of RBCs interferes with PCR reaction and therefore is a crucial prerequisite for extraction.
Step 3: Lysis of WBC
The nucleated WBCs are treated with a lysis buffer which removes the cell membrane and nuclear membrane and resultantly releases nucleic acid. The extraction buffer should have detergents and chemicals that remove lipoproteins, cell membrane components and proteins.
Also, use Proteinase K and RNase to make WBC lysis effective.
Step 4: DNA isolation, precipitation and purification
Now the pure DNA is isolated by centrifugation and precipitated using chilled alcohol and 1/10 volume of salt. Purification is performed by washing the DNA precipitate with alcohol. This article may help you to understand this step: What is the role of alcohol in DNA extraction?
Step 5: DNA rehydration (Dissolving DNA)
Now the DNA pellets are air-dried and rehydrated using the TE buffer or dd/W.
Step 6: Qualitative and quantitative analysis
To use it downstream, we have to perform qualitative and quantitative DNA analysis. Spectroscopy investigates the purity and yield of DNA while only the purity and overall quality may be assessed by fluorometric and gel electrophoresis analysis, respectively.
Pure DNA should have a 260/280 ratio of 1.80.
Step 7: Storage
DNA should be stored at 4°C and 98°C for short-term and long-term storage, respectively.
This is the most routine and general scheme of DNA extraction from blood. The basic steps will remain the same but the chemical composition may vary from protocol to protocol. Now let’s see how we can isolate DNA from various types of blood samples (Whole blood, dried spot, clotted blood and frozen blood).
How to extract DNA from whole blood?
Whole blood is directly drawn from the patient and is the most common tissue for DNA extraction. The conventional phenol: chloroform and isoamyl alcohol protocol is the most effective scheme here.
Take 200 to 300 µL blood in a microcentrifuge tube.
Add an equal volume of cell lysis buffer and mix well. Mixing can be done by inverting the tube many times and/or gentle vertexing.
(You can follow either one-step or two-step lysis).
Keep in mind that if you follow two-step lysis using two different cell lysis compositions, in the first step take pellets after lysis treatment and in the second step collect supernatant after treatment with lysis buffer two.
Centrifuge the sample at a low speed for at least 20 minutes. Centrifugation will release nucleic acid into the supernatant and cell debris will remain at the bottom.
Now add another lysis buffer and/or treat with phenol, chloroform and isoamyl alcohol. This step will help to get pure and high-yield DNA.
Centrifugation yields a DNA solution at the top collects it and adds an equal volume of alcohol and 1/10 volume of salt. This step precipitates the DNA into visible form.
To improve the yield, you can put the mix at -20°C for 20 minutes, chilling improves precipitation.
Now the precipitates are collected and washed with alcohol twice (1 ml alcohol).
In the final step, add 200 to 400 µL TE buffer and allow it to dissolve.
PCI protocol is easy to use, and simple and provides high-pure and high-yield DNA from whole blood. I have explained the protocol in our previous article and it is our own. You can get it from here: Phenol: Chloroform: Isoamyl alcohol protocol for Blood DNA extraction.
Advanced Optimization Tip:
How to extract DNA from Dried Blood Spots?
Dried blood spot sampling is employed for neonatal testing, pharmacokinetics and toxicogenomic analysis. Only a small drop of blood is drawn from the patient, usually from the finger or thumb and allowed to dry on paper.
Unlike the conventional blood collection technique, the present method is less painful and hence used during neonatal screening. The spot is allowed to dry in the air and sent to the testing facility.
This particular type of sampling is safe (for the technician), easy to transport and doesn’t need any adequate conditions. It lacks specific storage and transportation conditions and hence is used in screening programs from remote places.
The sampling includes heel or finger prick using a sterile needle followed by spotting the blood on a filter paper. The sample is allowed to dry in the air, stored and transported in a sterile polythene bag.
The dried blood spot paper is taken, cut into small pieces and transferred in the sterile 2 ml microcentrifuge tube.
a 500 µL lysis buffer is added to the tube and allowed to react with the DBS for some time. You can use pipetting to mix the solution with the DBS.
After that 10 µL of proteinase K solution is added to the mixture and allowed to react at room temperature for a few hours or as advised by a manufacturer. Or
The sample is incubated for 25 minutes at 60°C or 95°C for 15 minutes. This will increase the yield.
Afterward, follow the routine DNA extraction protocol.
Centrifuge the sample at 2000 rpm for 20 minutes.
Collect the supernatant and discard the pellets containing the pieces of filter paper.
Precipitate the DNA using an alcohol + salt combination and perform washing.
Let me tell you that there are many optimized and excellent protocols available for DBS and BS DNA extraction. We have enlisted the top 5 in our other article. You can read it here. Moreover, other related background information on microsampling techniques (DBS and BS) is also given in that article including the advantages, sampling technique, applications and importance.
How to extract DNA from Clotted blood?
We often use EDTA-collected blood for DNA extraction, however, you may wonder what if we have clotted blood? Or a blood clot? Can we extract DNA from clotted blood? The answer is Yes.
Two best-suited protocols for DNA extraction from the clotted blood are using the phenol: chloroform method and proteinase K method. We will elaboratively explain the proteinase K optimization for clotted blood.
Remove the serum part of the blood and take the clot.
Add the RBC cell lysis buffer (500 µL) and mix well. Centrifuge the sample and remove the upper phase.
Now wash the clot pellet with the fresh buffer and add WBC lysis buffer (500µL) and proteinase K (10 µL). Incubate the sample at 60°C for 30 minutes and allow it to cool at room temperature.
Centrifuge the sample and collect the upper aqueous phase.
Precipitate the aqueous solution with the alcohol and 1/10 sodium acetate.
Perform washing with alcohol twice and air dry the pellets.
Now add 300 µL of TE buffer and dissolve the pellets.
How to extract DNA from frozen blood?
Frozen blood is also used to isolate DNA and it’s effective too. The same protocol which is used to isolate DNA from whole and dried blood is used here also. The first pre-processing step is to collect the blood sample and thaw it at room temperature.
Thaw until it becomes liquid. You can also incubate the sample at 60°C temperature too. And perform isolation. For critical experimentation and diagnosis, I strongly recommend using the spin-column kit.
To effectively increase the purity and yield, add lysis buffer and proteinase K to the frozen blood and thaw it. It will make the nuclease inactive.
Note:
DNA can not be extracted from blood collected in a heparin tube.
Proven tips for extracting DNA from any blood sample
This segment is exciting and important too. I am, in this segment of the article, sharing my experience with you and tips and tricks that work, effectively and 100%. I also discussed this article with my colleagues and collected more information on this topic.
- 100 to 200 µL samples is enough to isolate DNA from blood. Remember the important point is to perform the isolation effectively.
- Use the blood sample collected in EDTA or sodium citrate tube. Avoid collecting and using heparin blood. Heparin is a potential PCR inhibitor and remains attached to the DNA even after purification. Contrary, EDTA can easily be removed.
- Perform mixing properly. This step is a key thing to success in blood DNA extraction.
- The best way to mix samples is inverting, avoiding too hard and many vortexing as it can damage or fragment our genomic DNA.
- Use isopropanol for precipitation (equal volume) and sodium acetate, however, other salt and alcohol may be used. This combination is unbeatable.
- Use ethanol to wash the DNA precipitate.
- Always use a fresh sample whenever possible or process the sample within 24 hours of collection. To prevent DNA degradation, store the sample at 4°C and prevent it from direct sunlight. Although we can extract DNA from blood spots or frozen blood, DNA extracted from fresh blood gives excellent yield and purity.
- Keynote: as the sample gets older, nuclease attacks our DNA, degrades it and eventually reduces the overall yield. Better to store at 4°C and 98°C for short and long-term storage, respectively.
- Use Proteinase K and RNase to avoid protein and RNA contamination and nuclease attack, especially for frozen blood.
Pro-tip: Thawing will re-activate the nucleases easily so when you use frozen blood, add proteinase K, RNase and lysis buffer directly to the frozen sample and incubate at 60°C until de-froze.
- Choose the best protocol you are comfortable with. I strongly recommend going with our ebook to understand the technical aspect of DNA extraction, I also have given a proven, active and effective protocol there.
Download it now: From DNA extraction to PCR.
- Many protocols are available, try every one, select one and set up your own routine protocol. I recommend using any of the manual DNA extraction methods that are cheaper and more effective.
- One of the important tips for excellent results is to perform a pilot experiment. Before using your chemical preparations for your actual experiments/tests, perform some pilot experiments. Test each chemical or step and use the same recipe and protocol for the samples.
- Using the same lysis buffer, alcohol, salts, steps, and other optimizations used during the pilot study reduces the time and helps to improve the results.
- Heat the TE-rehydrated DNA at 60 to 70°C for 20 to 40 minutes to effectively dissolve DNA and inactivate any nuclease, if present.
Common Troubleshooting
Imagine you have DNA. You extracted it from a blood sample and performed qualitative, quantitative and gel analysis. You identified problems, enlisted here,
- Un-dissolved DNA
- Low yield
- Low quality
- Presence of contamination
- Smear in the gel
- Fragments of DNA in the gel
Let us discuss each point and relevant troubleshooting.
Un-dissolved DNA
| Potential causes | Solution |
| DNA not dry properly | Re-precipitate the DNA, air dry it and re-dissolve it. |
| Presence of contamination | Re-precipitate the DNA, wash twice again and re-dissolve it. |
| High concentration of DNA | Add an extra amount of TE buffer and allow it to dissolve. |
Note: heating makes DNA rehydration easy.
Low yield
| Potential causes | Solutions |
| Low sample volume (results in reduced yield) | Increase the amount of starting material. |
| Too old sample (aged samples increase DNase activity that digests DNA and reduces the yield) | Use fresh blood or blood stored at 4°C for a week. Don’t use too old samples. |
| Incomplete lysis (the main reason for low yield is in-complete or partial cell lysis) | Process the sample immediately or store at 4°C. Use DNase inhibitors. |
| Presence of DNase | Process the sample immediately or store it at 4°C. Use DNase inhibitors. |
| The use of Frozen blood | Follows the process discussed in the DNA extraction from the frozen samples. |
Low purity
| Potential causes | Solutions |
| Low-quality lysis buffer | Use another lysis buffer or order a commercially available one. Improve your homogenization and lysis techniques, for example, the incubation time for lysis, heating, mixing, vertexing, etc. Reassess your lysis buffer composition, quality and quantity. |
| Presence of contamination | Uses a good quality lysis buffer; use proteinase K, RNase and other ingredients (like SDS, Nonidet P40) that improve lysis. Wash the sample well. |
Presence of contamination
| Potential causes | Solutions |
| In complete lysis | Use a good-quality lysis buffer. Refer to the above point. |
| Problems in purification | Use ethanol for purification and increase washing rounds. Air-dry the DNA well. |
| Composition of cell lysis buffer | Reassess your lysis buffer composition. It should have all the necessary ingredients. |
Tip:
Smear in the gel
| Potential causes | Solutions |
| Poor quality DNA, contamination and bad extraction procedure | Refer to the above sections: poor quality DNA and contamination. |
| Presence of RNA | Use RNase |
| Presence of protein and other impurities | Use Proteinase K |
Fragments of DNA
| Potential causes | Solutions |
| Active DNase | Avoid using an old and un-frozen sample, use DNase inhibitors, and immediately process the sample or store at 4°C. Follows practices to deactivate DNase. |
| Rigorous mixing, lysis and homogenization | Avoid aggressive vortexing. Use inverting mixing technique. Increase mixing time. |
Key optimizations
In this section, I will explain some additional optimizations that you can use to optimize your protocol for blood DNA extraction.
| Proteinase K | Proteinase K can be added to the protocol for effective protein lysis. | |
| Nonidet P40 | Nonidet P40 is added for effective RBC lysis and cell wall/ membrane lysis. | |
| RNase | To remove RNA contamination | |
| Heating | Heating at 60°C temperature for 20 minutes makes lysis effective. | |
| DNase inhibitors | DNase inhibitors stabilize DNA by protecting it from degradation. | |
| Triton X100 | Triton X100 is another detergent used for RBC lysis. |
Do you know?
For effective rehydration of DNA and RNA, the pH of the TE buffer should be 8.0 and 7.5, respectively.
Wrapping up:
I can write whole blood on blood DNA extraction, I have that much experience and information on this topic. But the sole purpose of writing this article is to avoid reading that much stuff.
Genomic DNA extraction from blood is a common and important scheme for diagnostic and research nowadays. Various types of kits are now commercially available and are effective too, but manual methods strengthen your basics, reduce the overall cost of the experiment and are super handy.
Therefore, everyone has to learn and use it. We have tried and tested many different protocols in our lab and we are planning to publish one universal and effective protocol for all. I will notify you later, once it is prepared.
I hope this article helps you. If so, please bookmark it and download the amazing and attractive pdf version of this article at a very low cost. This will motivate us to do better.
Resources:
- How to choose your method for DNA extraction from whole blood?– BiteSizeBio
- Video- Tips for successful DNA extraction from blood by BioLabs