“Discover essential technical tips for Sanger sequencing that are often overlooked. This comprehensive checklist is guaranteed to improve your experiment’s success rate.”
Sanger sequencing has become a gold-standard method recently. However, it has been in practice for many decades and is still effective, consistent, and useful. Despite having a few ‘many’ limitations, scientists’ first choice is Sanger!
Though it works on the principle of chain termination, the manual and automated methods have substantial differences.
The automation uses labeled ddNTPs that are detected during the capillary gel electrophoresis whereas in the manual method, a PAGE gel is still used. Practically speaking, the manual method is not in use now. Laboratories are using automation.
The process initiates with nucleic acid extraction and continues with PCR amplification, cycle sequencing and analysis, which most peers and students know! But that’s not sufficient to actually conduct a Sanger sequencing experiment and also succeed!
You need to know a few technical things before doing Sanger sequencing that no one is actually talking about! We are discussing those technical points in this article.
Stay tuned.
Related article: How to improve Sanger Sequencing Results?- 5 Technical Tips from Experts.
Key Topics:
Sample to be sequenced
You may wonder that, from any sample we have to sequence the “DNA!” Then why do we need to worry about our sample type?
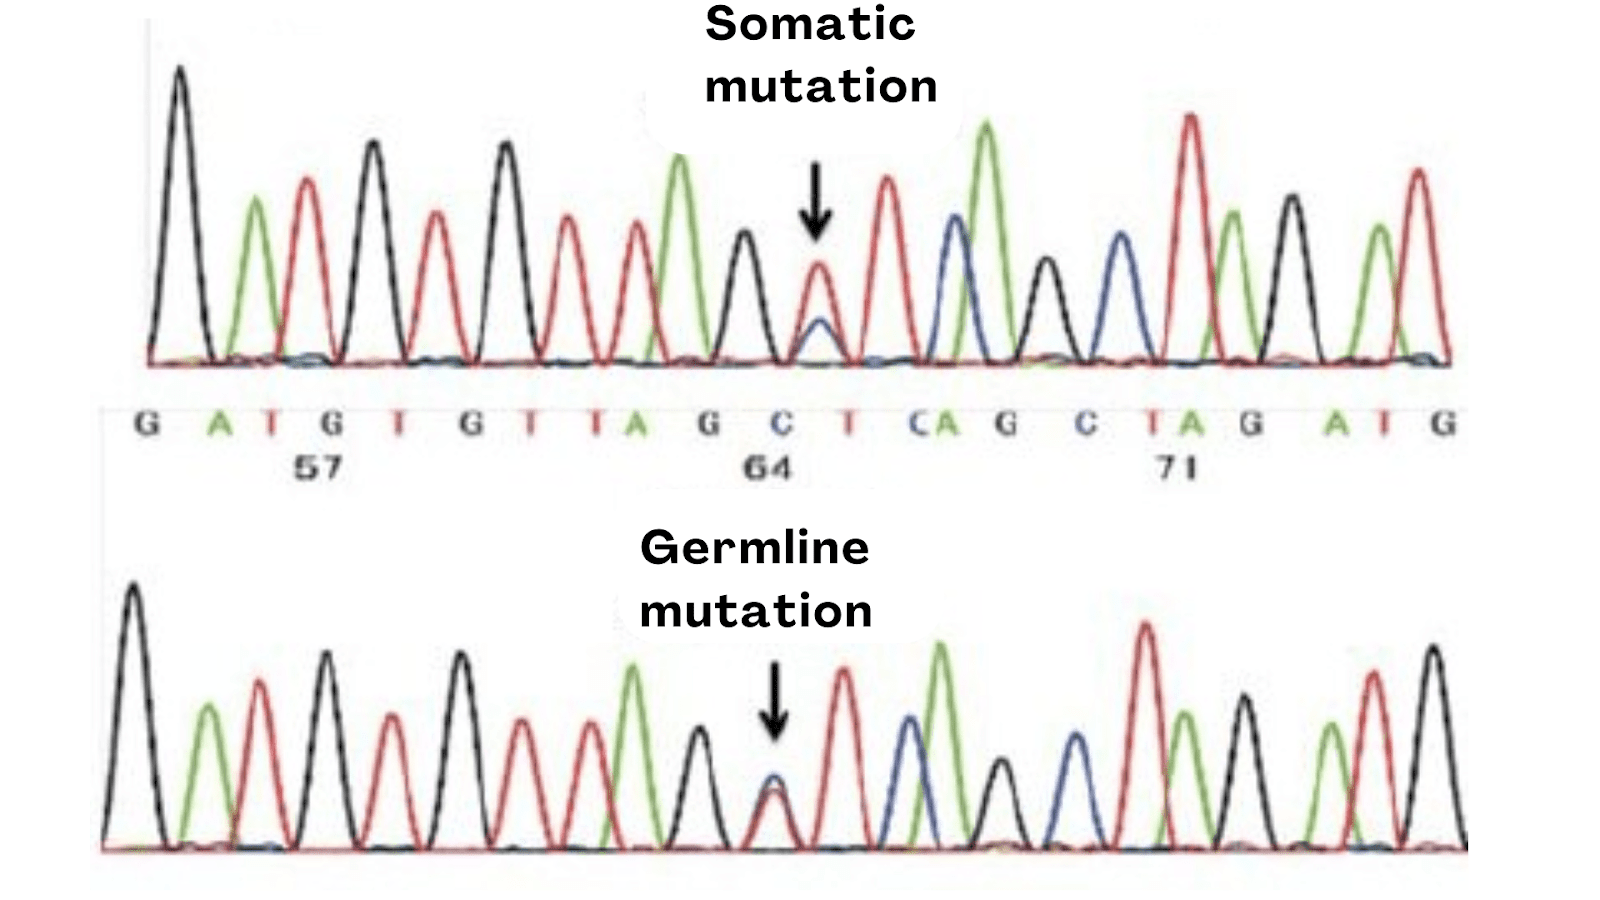
Let me explain it first. Sample type is directly associated with your Sanger sequencing results. For instance, the sequencing results vary between germline and somatic samples.
If a mutation is germline, then it is evenly distributed among all the cells, but that’s not the case with the somatic mutation. Somatic mutations are tissue-specific, which means those mutations are only present in the affected tissues or areas.
In addition, it is also quite possible that not all the somatic cells carry the mutation or are cancerous, in that case, the results may vary. For instance, out of 100 cells (from a cancer tissue sample), only 30 cells carry the mutation.
In that case, in the heterozygous condition, we will observe different-sized peaks for the mutations. Contrarily, for the germline mutation, the peak size will remain the same in the heterozygous condition.
So if you are studying any somatic cancer, you have to collect the tissue sample from the affected area, and in that also, there are chances that you may not get the target mutation. Again, because all the cells are not equally affected.
Contrary, if you are studying any inherited cancer or condition, then you can choose any bodily sample and go for sequencing.
Sounds new!
We will cover a complete article on this topic, later.
Furthermore, sequencing results may also vary among different types of samples. For instance, for a plant, blood, saliva, bacteria, plasmid or even cancer tissue, you may observe differential peak patterns, background noise, contamination, sequencing accuracy and so on.
Next! What do you have to do?
You need to choose a well-suited DNA extraction method.
Related article: What is Somatic and Germline Mutation?
DNA Extraction method
Choosing a DNA extraction method is a key to success in Sanger sequencing. If you are in the diagnostics or dealing with some sensitive experiment, undoubtedly, use a ready-to-use kit.
No other method will give you the best results. However, for research, you can use a manual method. Manual methods are sufficient enough to provide a good quality and quantity of DNA. Selection is difficult too, perhaps.
Different samples have different cellular structures and organization and need differential treatment. So you have to choose the technique carefully. This table will guide you through!
| Sample type | DNA extraction method |
| Blood | Phenol, chloroform and isoamyl alcohol |
| Buccal swab or saliva | Spin-column kit or magnetic beads |
| Tissue sample | Proteinase K DNA extraction method |
| FFPE tissues | Spin-column kit or magnetic beads |
| Plant sample | CTAB DNA extraction method |
| Microbial sample | Bead beating, spin-column or magnetic beads-based DNA extraction |
| Plasmid DNA | Alkaline lysis followed by spin-column kit. |
Pro-tip:
From my personal sequencing experience: the results you will get from manual methods are not as good as a ready-to-use kit due to the presence of PCR inhibitors and impurities.
Read length:
Sequencing read length is defined as, “the number of nucleotides going to be sequenced in a single run.” as simple as that. The ideal read length for a Sanger sequencing is 1000 to 1200 bp.
On a technical side, let me tell you, if you design an experiment focusing on this read length, you will not get good results. The Sanger sequencer can accurately sequence 250 to 500 nucleotides.
(With good sequencing quality!)
After that, as the read length increases, the accuracy decreases. That means those results will be confusing, unclear and non-conclusive. So what do you have to do?
I am giving you one tip.
For instance, if your gene is 1200 bp in length, design 4 different sequencing runs of 300 bp instead of a single run. Meaning, divide your gene into 4 parts, design 4 different primers and you will get amazing results.
But wait! It’s not that simple!
Primer designing is a headache in sequencing. Let’s discuss that first.
Related article: Sanger Sequencing vs PCR: Common and Technical Differences.
Design flanking primers
Now here is the catch!
The Sanger sequence can’t correctly sequence the first and last 50 to 60 nucleotides. So even if your read length is 300 bp, make sure that at least 100 nucleotides will not be sequenced well enough.
So what can we do?
Design sequencing primers in a way that flanks your region of interest. For example, we divided our gene into 4 parts of 300 bp. Now, what we do is design primers for each 300 bp fragment.
But! We took 60 to 100 bp flanking regions for primer design, so that our main 300 bp part remains in the middle and can be accurately sequenced. I guess the concept is clear now
We will explain this point in detail in a separate article.
Manage amplification:
Amplicons are run in the capillary machine to read the sequence. Thus, amplicons should be good enough to sequence. For instance, allelic dropout results in amplicon abnormality.
Allelic dropout is also a problem in sequencing, if there is any mutation on the primer binding side, your primer will not bind and you will get only a single type of amplicon.
If your plan is to sequence the forward sequence and is not amplified, you will not get results in sequencing.
Manage the sequencing run accordingly, and design the primers that will not cover any indels in the primer binding site. Validate the results on the gel before sending it for sequencing.
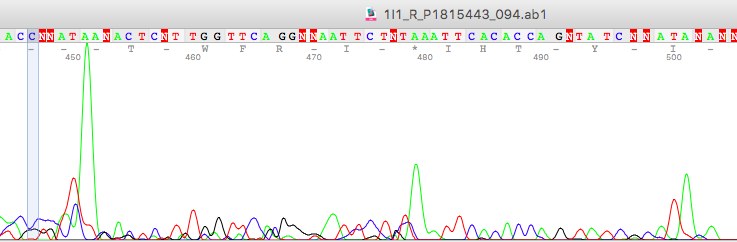
Impurities affect Sanger’s results
Impurities in the Sanger sequencing template will surely mess up your peaks. eventually, it will make your results non-readable.
Impurities present in the DNA sample, after amplification or cycle sequencing reaction may interfere with the sequencing product.
Common problems are,
- It will decrease the cycle sequencing rate for a particular nucleotide or even for an entire fragment.
- It increases the chances of wrong or false base calls.
- It generates unnecessary peaks and problems in results.
- It can generate background noise that interferes with results and analysis.
To overcome these problems, it is necessary that the ‘fragment to be sequence’, is in the highly pure state.
- Perform purification after DNA extraction to remove PCR inhibitors.
- Perform another purification after PCR amplification to remove unused ddNTPs, buffer, polymerase and initial amplification products.
- Perform final purification after cycle sequencing or before capillary electrophoresis to remove unused dNTPs, ddNTPs and non-chain terminated fragments.
That’s it, now you are ready to design your Sanger sequencing experiment.
Wrapping up:
In conclusion, it’s essential to understand your sample type and select an appropriate DNA extraction method, design primers that target the flanking regions, manage read length, and address impurities.
Use this checklist as a guide before planning your Sanger sequencing experiment. However, a deeper understanding of the full process is still necessary for successful experiment design. We’ll explore that next, using an example.
These points are too technical and only be observed by experts. So such information will increase your sequencing efficiency. I hope you like this article. Do share it and subscribe to Genetic Education.