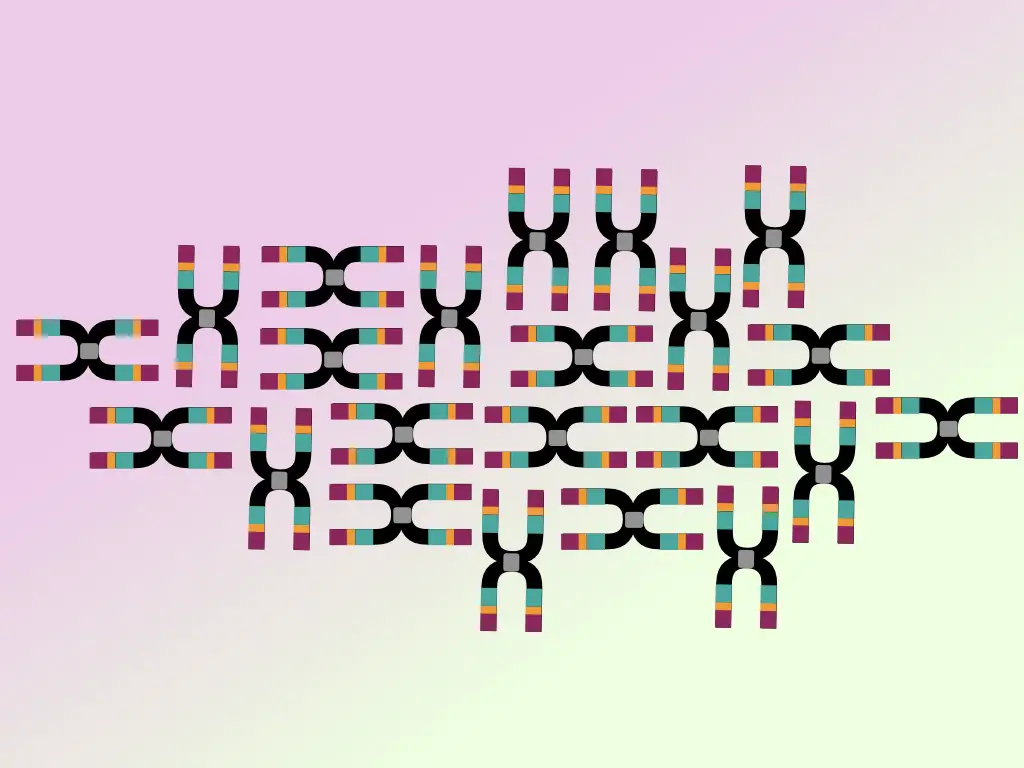
“The DNA ladder is a standard-sized molecular marker or fragments of DNA applied to determine the size of PCR amplicons. 50bp, 100bp, 1000bp and 3000bp are several commercially available and popular markers.”
When we are talking about the PCR we run our final PCR products or genomic DNA on a gel. Usually, the PCR products are run to determine fragments size.
Different fragments have different running speeds, larger fragments run slower while smaller fragments run faster. So technically, without a reference or standard size marker, we can’t understand what size a fragment has!
So without any reference; the gel run doesn’t make sense. The DNA ladder is simply a composition of standard-size fragments that runs according to their fragment size. It helps to determine the size of DNA fragments. Like the DNA ladder, RNA and protein ladder do exist and are used in various biological experiments.
In the present article, I will explain to you what the DNA ladder is, its importance and how you can prepare your own.
Read our amazing article on DNA (a pictorial guide): DNA story: The structure and function of DNA
Key Topics:
What is a DNA ladder?
The DNA ladder is a combination of various known-sized dsDNA molecules which is used as a reference during gel electrophoresis.
Importance of DNA ladder:
Now, let’s understand the importance of the DNA ladder using an example. See the image given below.
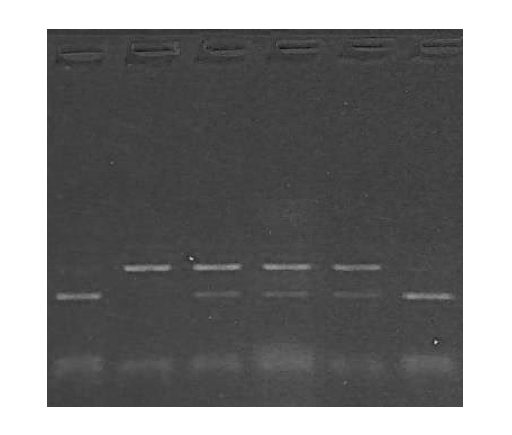
The image is the result of agarose gel electrophoresis with different fragments of DNA. What can you conclude from this gel plate? Is it conclusive?
No. it is not, because it is like “sailing in a sea without a compass.” getting my point. But when we use a DNA ladder, we can conclude something, take a look at the image below,
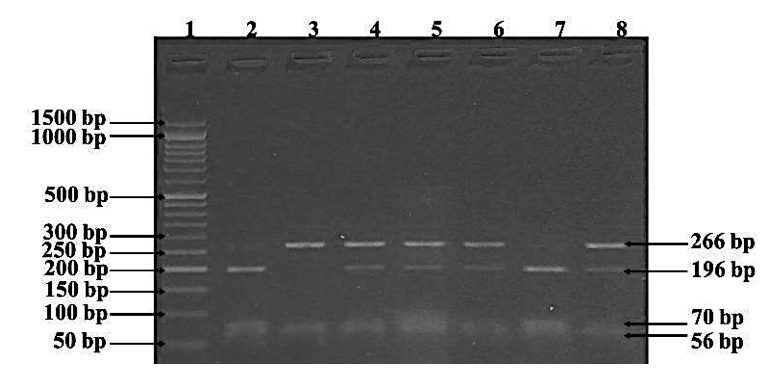
It’s the same image but with a reference- DNA ladder. Now it’s easy for us to identify every band present in a gel.
The DNA ladder or marker gives us an idea about,
- The size of the DNA fragment
- The type of experiment- PCR amplification, restriction digestion or DNA sequencing.
- Distinguish homozygous from heterozygous
- Help understand the results of diagnostic samples.
However, An ideal DNA ladder sould have several characteristics which the electrophoresis experiments need.
- Every fragment of the ladder must be separable from each other.
- Every fragment has enough concentration to visualize on a gel
- The composition of DNA gel loading dye must not affect the specificity of the DNA ladder.
- The ladder must be stable enough to use for a longer period of time.
- The ladder must be highly purified (prefer chromatography-based purified DNA ladder). Don’t use it, if it contains some unnecessary or unknown fragments (in that case contact the manufacturer).
Effect of the gelling conditions on DNA ladder:
The DNA ladder is a combination of various known-sized DNA fragments much like our amplicons and therefore the gelling conditions have a direct effect on it.
The excellence of results depends on proper migration and accurate separation of every fragment of the DNA ladder. If a single band doesn’t appear on a gel, it will lead to a false interpretation.
The migration of the DNA ladder depends on the concentration of buffer, voltage, the concentration of a gel and ingredients of gel loading dye.
Ideally, the 1X concentration of the gel electrophoresis buffer is sufficient. If the concentration of the buffer increases, excess concentration prevents the migration and separation of the DNA ladder.
Resultantly, sharp and smooth DNA bands will not appear.
Electric current is another factor that is as crucial as the buffer.
Ideally, 5 to 10V/cm gel is recommended by experts, however, if the voltage increases DNA fragments are trying to migrate fast resulting in the shearing DNA bands.
Run a gel on an appropriate voltage condition. Ideally, 50 to 80V for 2% gel is highly recommended.
The concentration of a running gel has yet importance and impact on fragments migration. Too high gel concentration unnecessarily forces DNA to run faster which results in a bad quality banding pattern.
Those sometimes aren’t conclusive.
For example, if you are running a 2% agarose gel, don’t use 3000bp (3kb) DNA ladder because a 3kb fragment can not migrate properly. The 3Kb ladder, therefore, isn’t a correct choice for agarose gel electrophoresis of PCR amplicons and restriction digestion.
Contrary, the 2% gel can’t separate 10bp or 50bp fragments of the DNA ladder hence using a 10bp ladder is worthless. Those fragments may not be visible. The 10bp or 50bp DNA ladder is ideally recommended for 3% gel (restriction digestion) and PAGE.
PAGE can separate smaller DNA fragments sharply.
Related articles:
- “Primer Dimer”: Zones DNA amplification by pairing with foe oligo
- Optimize your PCR reaction using the Gradient PCR
- What is ARMS-PCR or allele-specific PCR?
100bp DNA ladder:
In the 100bp DNA ladder, the smallest fragment is 100bp.
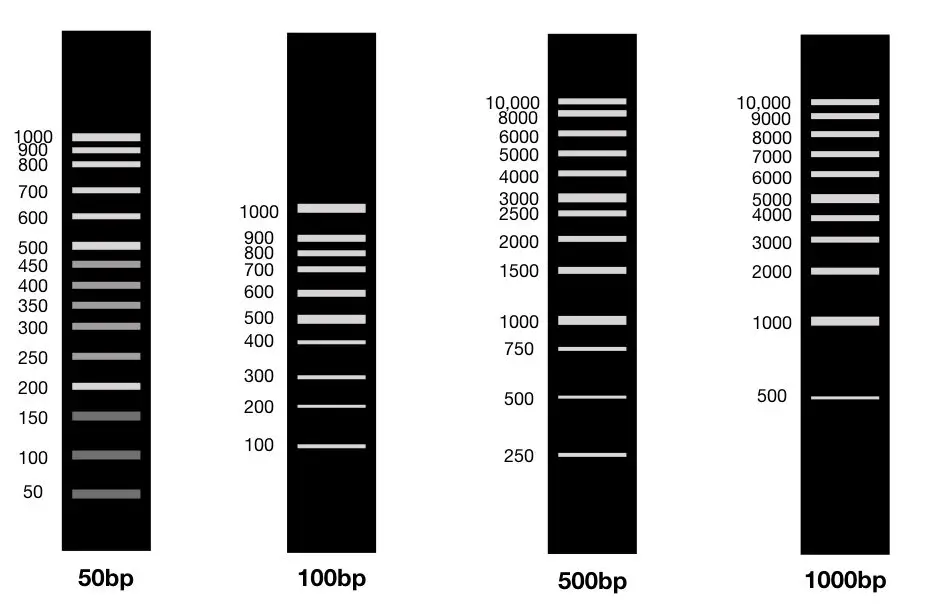
The other fragment varies from manufacturer to manufacturer. See the image given below,
Ideally, the 100bp DNA ladder contains 10 fragments of 100bp, 200bp, 300bp, 400bp,500bp, 600bp, 700bp, 800bp, 900bp and 1000bp. However, some manufacturers provide 100 to 1500bp.
Ideally, the concentration of each DNA fragment is ~25ng except 500bp and 1000bp fragments.
The concentration of the 500bp and the 1000 bp fragment is 100ng, therefore, it can look sharper and more concentrated than other fragments.
The 100bp DNA ladder is one of the commonly used standard molecular weight markers in the PCR.
2% agarose gel concentration is ideal for it, although, 2.5% concentration of gel gives more sharpened DNA bands (our own observations).
1000bp (1kb) DNA ladder:
The 1000bp DNA ladder isn’t commonly applied for conventional PCR, the reason is that the normal/conventional PCR amplifies DNA fragments between 100 to 1000bp or maximum up to 1500bp.
The 1000bp ladder contains 10 fragments ranging from 1000 to 10kb so in this case, it’s worthless. The 2% gel can’t separate fragments of 5000bp or 10,000bp. This ladder is specially prepared for long-range PCR experiments in which the usual length of amplicons is 5000bp or more.
The long-range PCR needs 2.5 or 2.8% gel to separate amplicons as well as the ladder. 2.8% gel gives sharpened DNA bands of more than 1000bp. In addition, running gel at a lower electrical current helps in proper separation.
How to make a DNA ladder? a DIY guide
3 different techniques are most popular to do so.
- Ligation method
- Restriction digestion
- PCR amplification
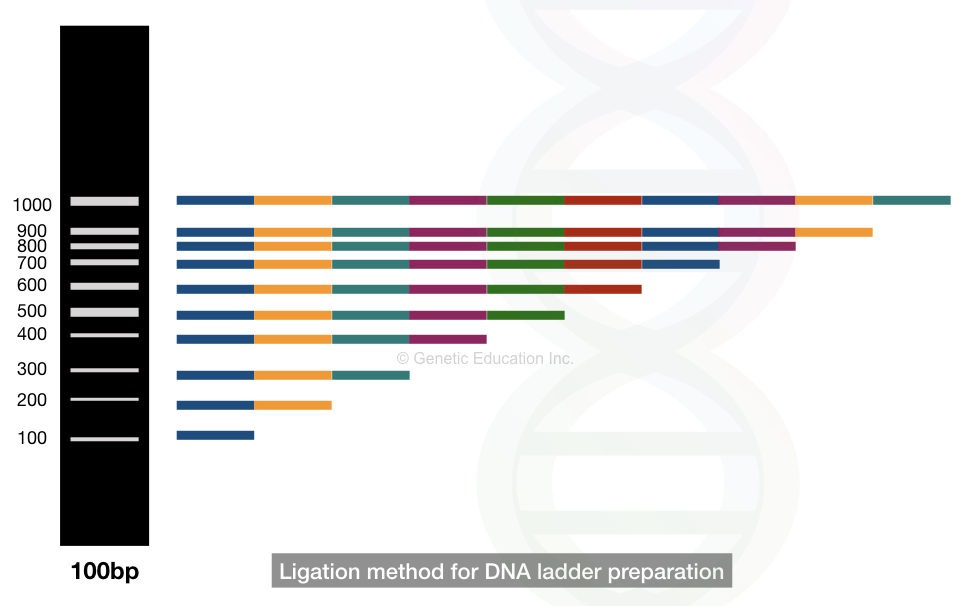
THe ligation-based method is the traditional method that nowadays isn’t commonly practiced to make DNA ladders. Put simply,
In the ligation-based DNA ladder development, different fragments of 100bp are covalently joined by the phosphodiester bonds that generated different fragments of 200bp to 1000bp.
See the image,
In the restriction digestion method, the known restriction endonuclease is used to digest different fragments of DNA that generate different-sized fragments of DNA. The digested fragments are collected, purified and can be used as a DNA ladder.
However, both methods are outdated, costlier and time-consuming. Moreover, the yield of fragments is lower as well.
The third method, the PCR-based DNA ladder development is cheaper, faster, efficient and gives a high yield. Millions of copies of fragments are generated in a shorter time. So it’s the most popular method for generating various sized DNA ladders.
The process is explained here,
A plasmid is selected which is usually a bacterial phase plasmid and digested using an appropriate restriction endonuclease. Digestion results in the linearization of circular DNA.
Let’s take a practical example. Suppose we have selected a lambda phage DNA sequence for manufacturing the ladder. The sequence ranges between 6632 and 7630. Primers are designed depending upon various complementary sites.
Different sets of primers are used for multiplex PCR amplification. The complete set of primers are given in the table below,
| Primers | Position | Length (bp) | Combination | |
| R1 | 5′-GTTATCGAAATCAGCCACAGGGC-3′ | 7630 | 0 | |
| F1 | 5′-AACGGCGTTTCGTGTCTCTGCCGGT-3′ | 7531 | 100 | F1-R1 |
| F2 | 5′-TGGATACGTCTGAACTGGTCACGGT-3′ | 7431 | 200 | F2-R1 |
| F3 | 5′-ACGGATGAAACTGCCGGTCAGGACA-3′ | 7331 | 300 | F3-R1 |
| F4 | 5′-CCGCTCGCTGGGTGAACAA-3′ | 7231 | 400 | F4-R1 |
| F5 | 5′-GATGAGTTCGTGTCCGTACAACTG-3′ | 7131 | 500 | F5-R1 |
| F6 | 5′-ACGCCTCTGCCCGTTACCCGAA-3′ | 7031 | 600 | F6-R1 |
| F7 | 5′-TCCTGCCGCACAACACGATG-3′ | 6931 | 700 | F7-R1 |
| F8 | 5′-AAAGACCTGGGCAAAGCGGTGT-3′ | 6831 | 800 | F8-R1 |
| F9 | 5′-GTTCGATCCGAAAGGCTGGGCGCT-3′ | 6731 | 900 | F9-R1 |
| F10 | 5′-GCGGCACGGAGTGGAGCAAG-3′ | 6631 | 1000 | F10-R1 |
Notedly, we need a totally different setup and reaction preparation for achieving good PCR amplification, high yield and amplification of all fragments.
Keep in mind that the forward R1 primer is used in all reactions to amplify all fragments and so we add 10 fold more R1 primers in the reaction. Take a look at the reaction preparation conditions.
| Component | Concentration |
| dNTP mix | 300-400μM |
| PCR buffer (50mM KCl, 2 mM MgCl2, 10mM Tris-HCl) | 1X |
| F (forward primer | 10pM each |
| R1 (reverse primer) | 75-80pM |
| Taq DNA polymerase | 5U |
| DNA | 30-50ng |
| Nuclease-free water | As per requirement |
You can also read our PCR reaction preparation guide to learn how to prepare an effective PCR reaction: PCR reaction: Ten secrets that nobody tells you
Now the present technique relies on three different methods i.e. Hot start PCR, multiplex PCR and touchdown PCR.
- Amplification is carried out in a single reaction for all fragments- multiplex PCR.
- The amplification efficiency is increased by decreasing the temperature- Touch down PCR.
- The Taq DNA polymerase is added only when the reaction initiates- hot-start PCR.
If you would like to learn more about each method, separate articles are given in below,
| PCR Steps | Initial Denaturation | Denaturation | Annealing | Extension | Final extension |
| Temperature | 90 ̊C-95 ̊C | 90 ̊C-95 ̊C | 56 ̊C-44 ̊C | 72 ̊C | 72 ̊C |
| Time | 5min | 50 sec | 50sec | 2min | 7 min |
| ——————– | ——————- | 25-30 cycles | ————— | ——————— |
Note: The method is a touchdown PCR, therefore, decrease the temperature after 2 PCR cycles until the temperature reaches 44 ̊C.
When the run completes, the products are run on 2% agarose gel under all standard conditions. If you would like to learn more about the technique, this article will help you: Agarose gel electrophoresis.
Run the gel on 80V until the DNA reaches up to the 75% distance of the gel. After completion, we will get 10 separate DNA fragments, results are compared with the standard ready-to-use ladder.
Our hand-crafted DNA ladder is almost ready but we have to purify it first before use. Alcohol purification is a preferable method; the final precipitates are dissolved back in the TE buffer. We can also use the Phenol-chloroform method or ready to use DNA purification kit.
Once the fragments are dissolved, purity is achieved, storing the ladder at 4ºC temperature. Use 5μl DNA ladder during gel electrophoresis.
Unfortunately, multiplexing reactions isn’t that easy! It needs more experience and expertise. So what can we do?
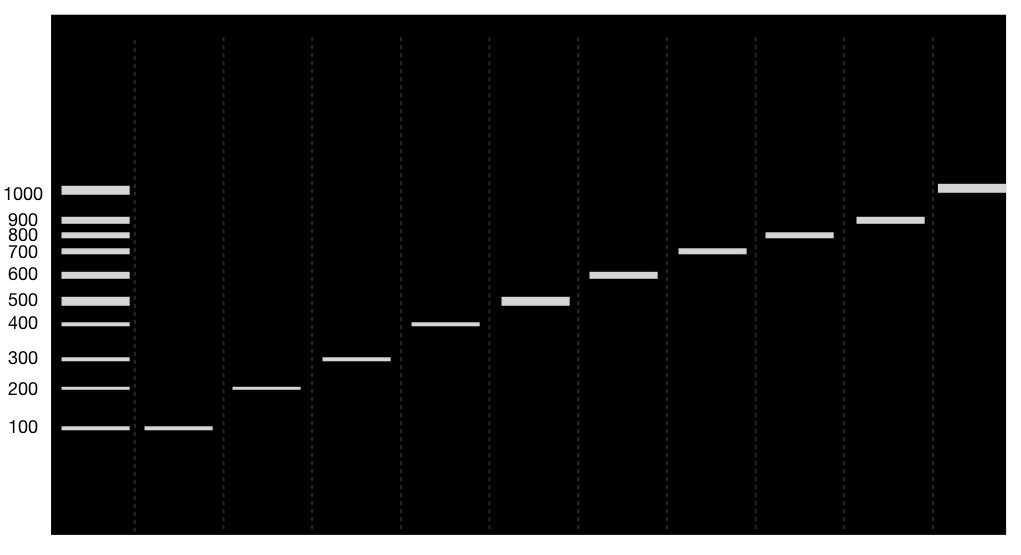
We can prepare to separate reactions to amplify each fragment, the rest of the process remains the same. Keep in mind that it’s important to validate results using the ready-to-use reference ladder of a similar size.
The results of 10 separate PCR reaction looks like this,
Related articles:
- A complete guide for analysing and interpreting gel electrophoresis results
- Part 2: Analysing and Interpreting (Agarose) Gel Electrophoresis Results
Conclusion:
Producing our own 100bp or 1000bp (1kb) DNA ladder is a wise decision if the workload in the lab is very high.
The cost of the overall experiment for preparing the DNA ladder is much lower than the commercially available kits. Once you purchase primers, you can make your own DNA ladder.
I strongly believe that doing manual work like this improves our skills and expertise as well as reduces the cost of the experiment.
Reference:
Wang, Tian-Yun et al. “Preparation of DNA ladder based on multiplex PCR technique.” Journal of nucleic acids vol. 2010 421803. 25 Jul. 2010.
FAQs:
